
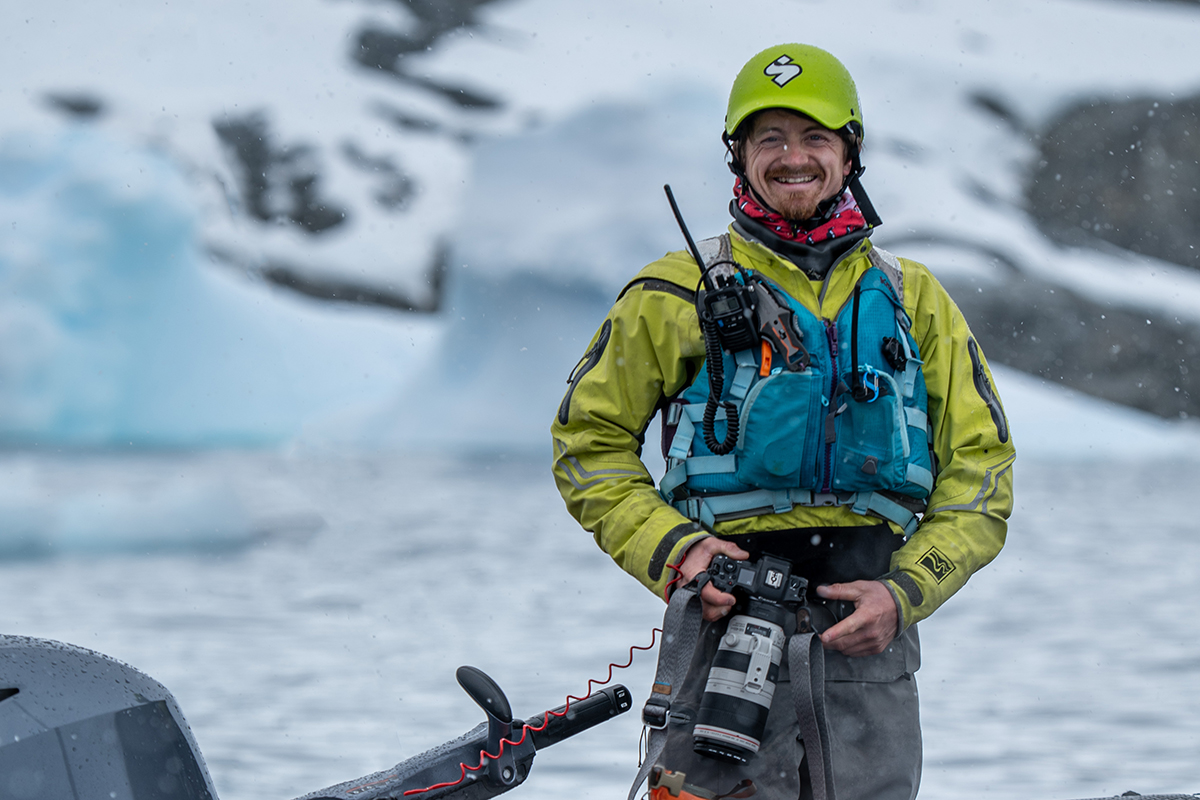
Kayak Photography
With over a decade photographing adventures around the world from the vantage of a sea kayak, our guide Will shares his top tips and handy hits for taking photographs from a sea kayak.
Protecting your equipment
TOP TIPS TO SAVE YOUR CAMERA
Cameras do not like salt, they also do not like water. Combine these two and you’re on the fast track to destruction. Whether a phone or a DSLR the first line of defence is to keep your kit dry. The easiest way to do this is to use a dry-bag.
Drybags
For phones there are many options of waterproof cases such as Otterbox cases or cheaper alternative phone dry-bags. These protect the phone well but do often come at a compromise to image quality. The former ‘box style’ cases generally produce better results with less blur than ‘bag style’ protective cases.
For large cameras a dry-bag is something you want to trust implicitly. Doubling up to a second bag works efficiently but compromises the speed and ease to retrieve your camera when the desire arrives. Personally I am a huge fan of the Watershed drybags which I have tried and tested for toughness and more importantly have a fast access zip, which really assists in recovering a camera when you want it.
Where and how you store your camera/phone also can affect its protection. Stashing a phone in a buoyancy aid or pocket will leave it much more vulnerable than in a sealed day hatch on your kayak. A large dry-bag is moderately more protected between your legs beneath your sprayskirt than on deck, but cannot be guaranteed in the event of a swim, I personally sit mine on a foam pad to avoid it resting in any residual water in the cockpit. Anything stashed between your legs needs to be ‘clean’ with no dangling straps to risk entanglement. Practice with a friend or partner should also be taken when removing yourself from a kayak with a camera between your legs. Stashing a dry-bag on deck also works up to a point, in larger waves this will become bothersome and can also put your camera in a risky position to damage should you need to rescue a fellow paddler. Storing in the day-hatch behind your cockpit also works but can be more challenging to retrieve in rougher water.
Moisture management – On the move
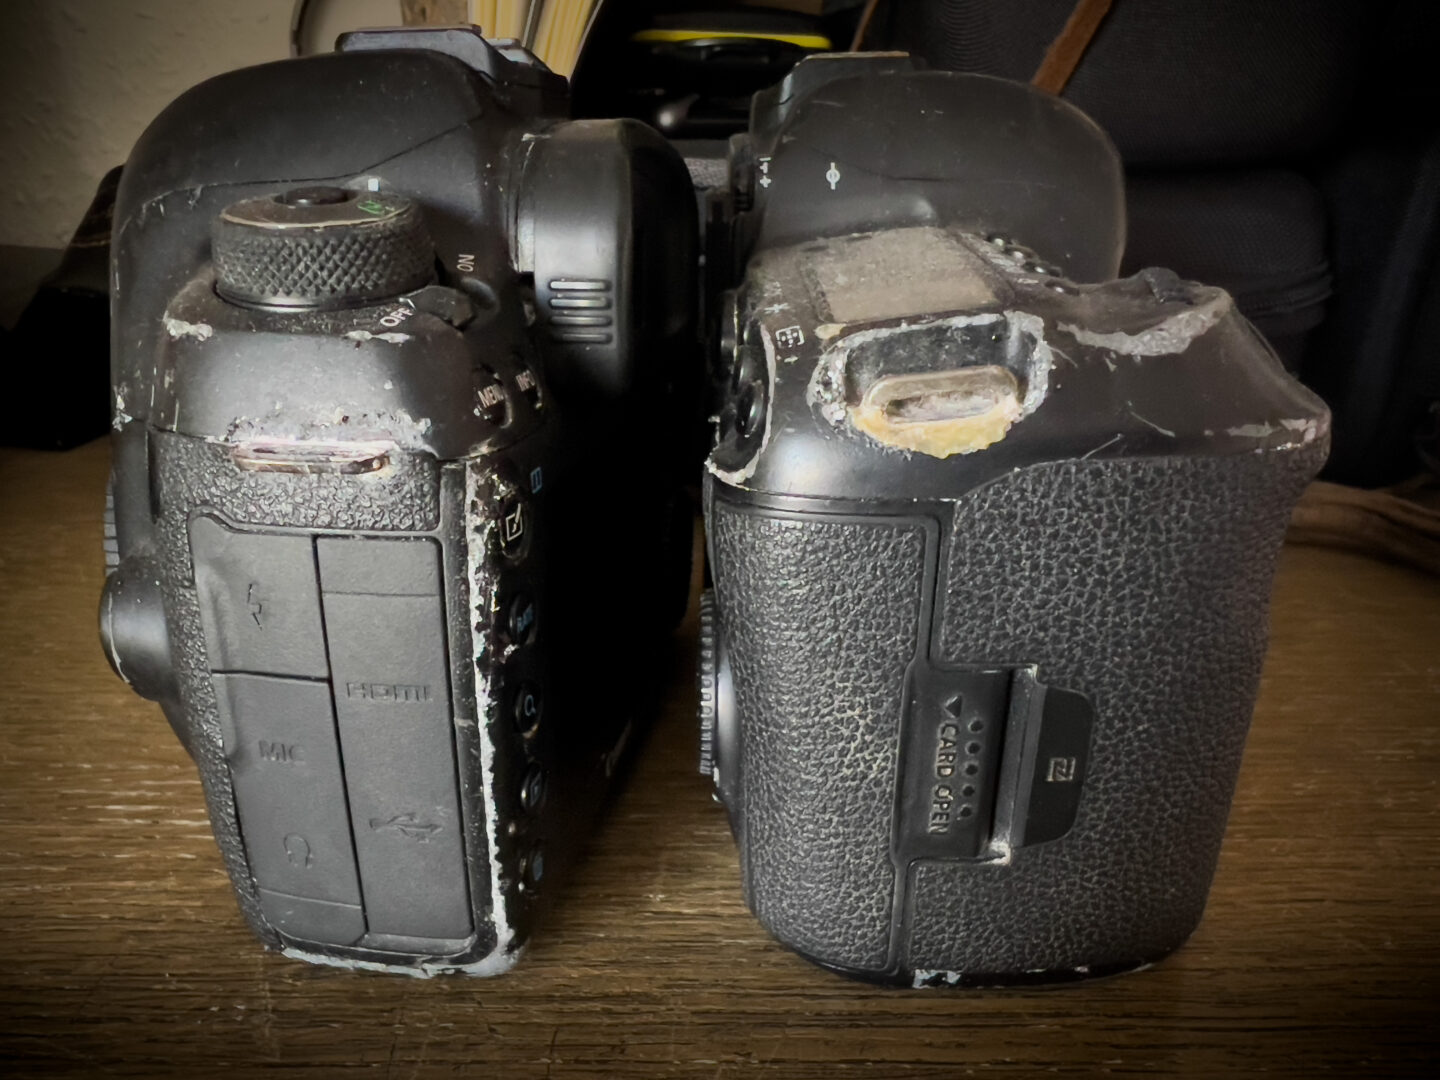
Residual moisture is the fastest and most efficient way I have destroyed cameras in the past. Moisture can be introduced to your device from sea spray, rain and more commonly from our own hands. Dealing with this effectively is essential to keep a happy camera.
Dry your hands. As a paddler we often have damp or wet hands, which will inevitably transfer to your camera as you use it. Shaking out your arms will reduce any drips from your jacket/drysuit and a quick wipe on a hat or buoyancy aid will drastically reduce any damp on your skin. In a perfect world we would carry a towel, but in practicality this is often not so easy.
Any residual left on your camera will transfer inside your camera bag. To combat this I would recommend adding moisture absorbers to your dry-bag or camera case, these will help reduce the humidity inside and have the added bonus of combatting mist for camera case users. Personally I use a home-made bag built from an old set of womens tights, cut off at the socks which I have filled with the small silicone packets you get in footwear stores. Your local shoe store will likely give them away for free if you ask them politely. Alternately you can buy pre-built reusable silicone bags online. Wherever possible I will also wipe my camera down after use with micro-fibre towels. At lunch if good weather I like to remove my camera from the bag to give it some air.
Moisture management – Post Shoot
Making a habit of purposefully cleaning your camera down every night after using it on the water is also strongly recommended. I find a micro-fibre towel works well for the body. The harder to reach recesses will require a small mid-softness brush, which best works when sprayed with lens cleaner. Using a brush to gently scrub between the buttons, grip rings and harder to reach recesses is most essential as this is where salt likes to gather. Pay particular attention to the clip points for a camera strap, the camera strap itself will hold salty water to the body and rapidly degrade a magnesium camera body.
Cleaning the glass on your lens: To do this you will need lens cleaner and or fresh water. Salt water when rubbed off will leave a thin layer of salt on the lens which can cause a faded/blurred image as a result. The use of multiple lens cloths also helps greatly here.
Top Tips
Attach some strong 2/3mm dyneema chord loops between the cameras attachment points and your strap. This reduces the problem of damp strap degradation immensely and is a simple and quick solution. Regularly check the chord is not too worn or impregnated with salt spray.
Use warm water when washing go-pros or waterproof cameras. Luke warm water will remove salt far faster than cold water. Do NOT use hot water as this will damage the device.
Use a mid-bristle fingernail brush and lens cleaner to clean salt off your DSLR and lenses. It is far more effective than a cloth.
Attach a small piece of towel to the underside of your cap brim. This place will remain dry for longer and allow you to wipe your hands quickly on the move.
Store batteries and spare memory cards in a separate waterproof bag to your camera. Reducing salt and moisture exposure
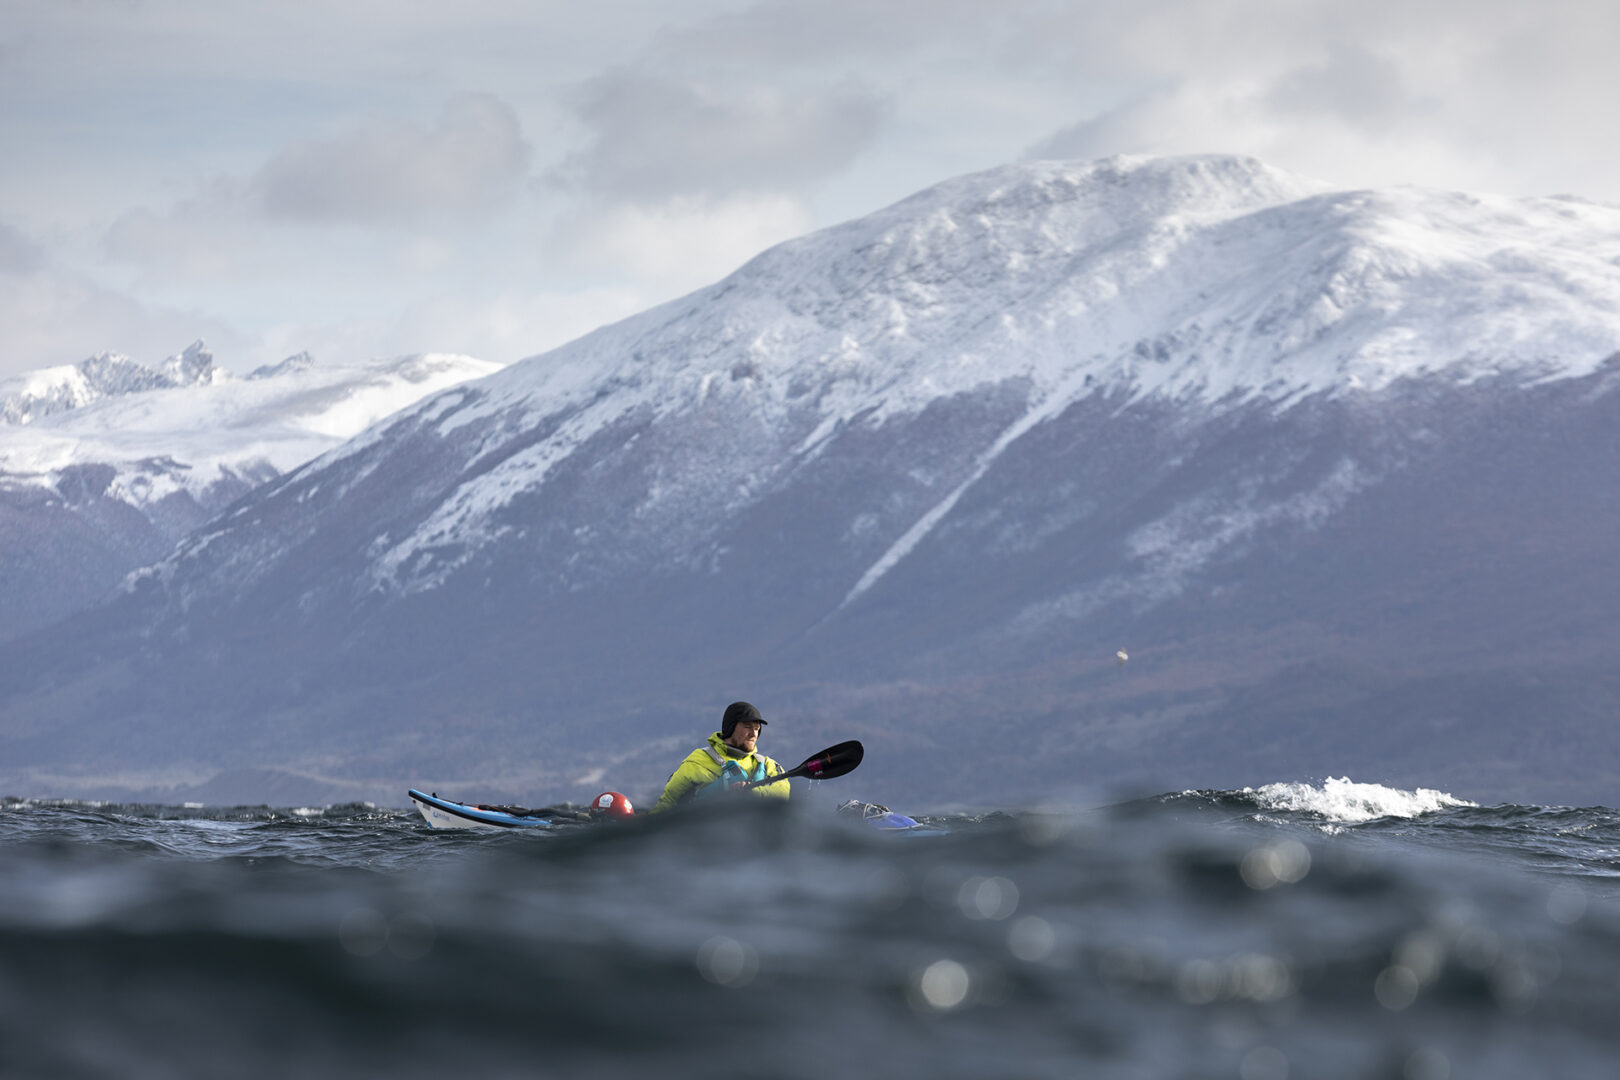
Points of Perspective
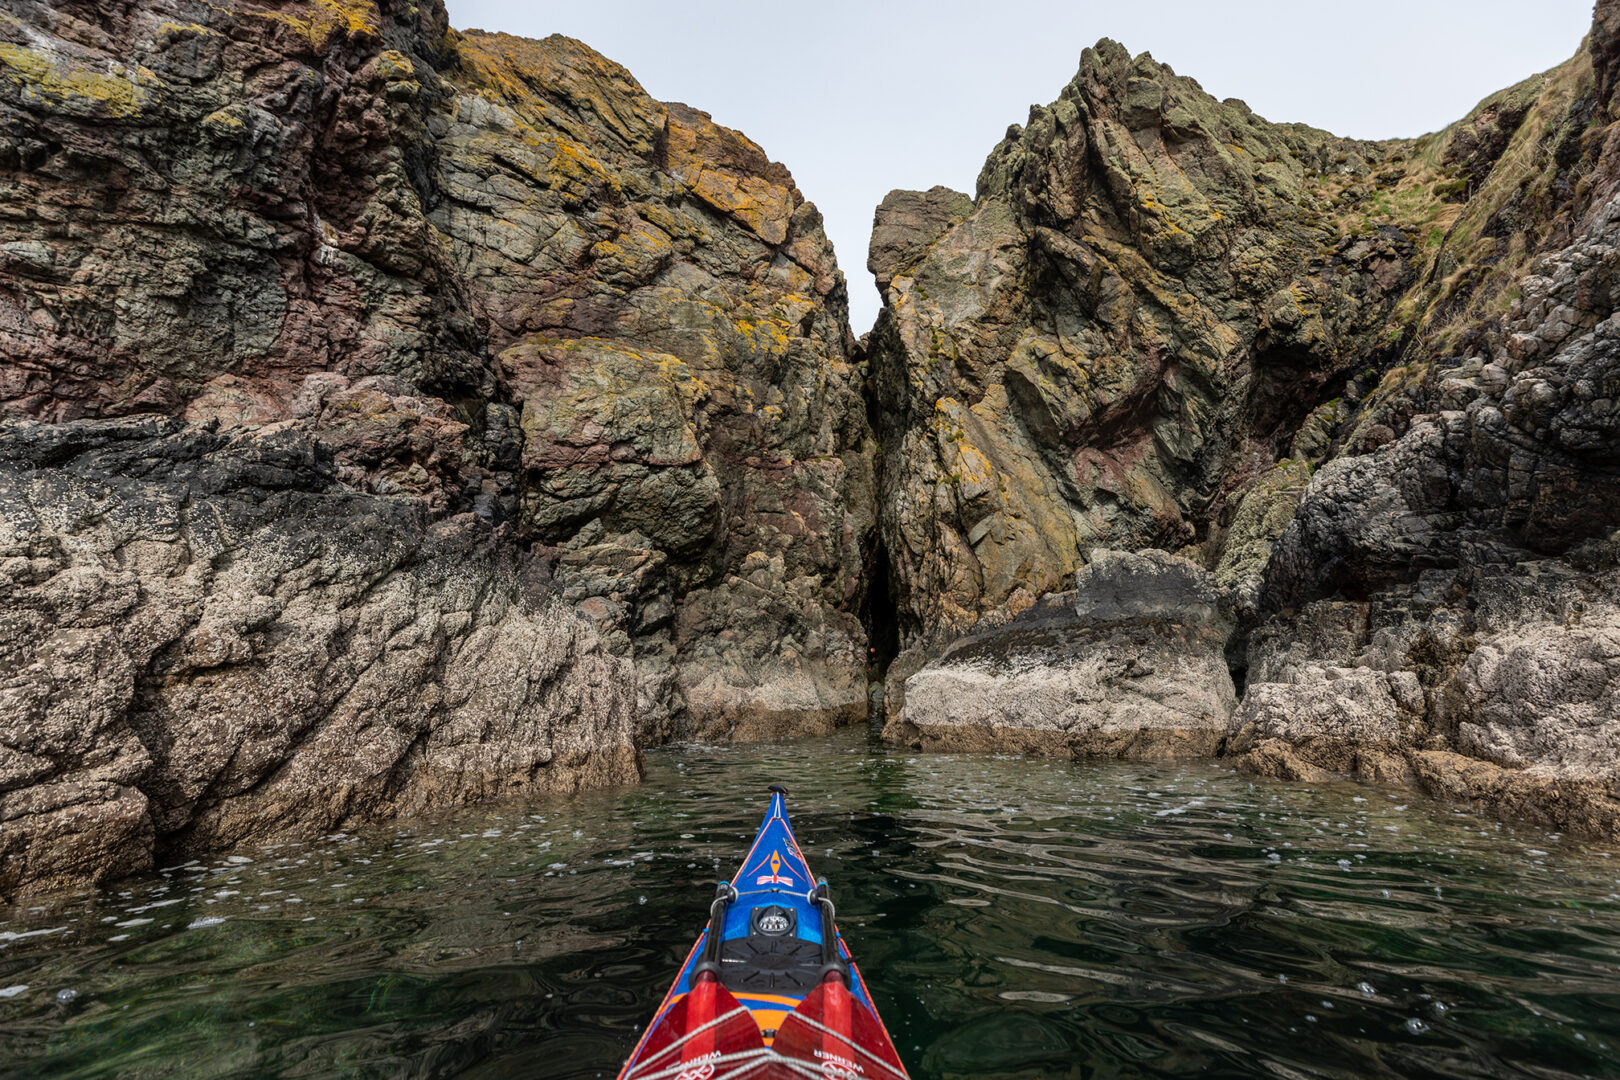
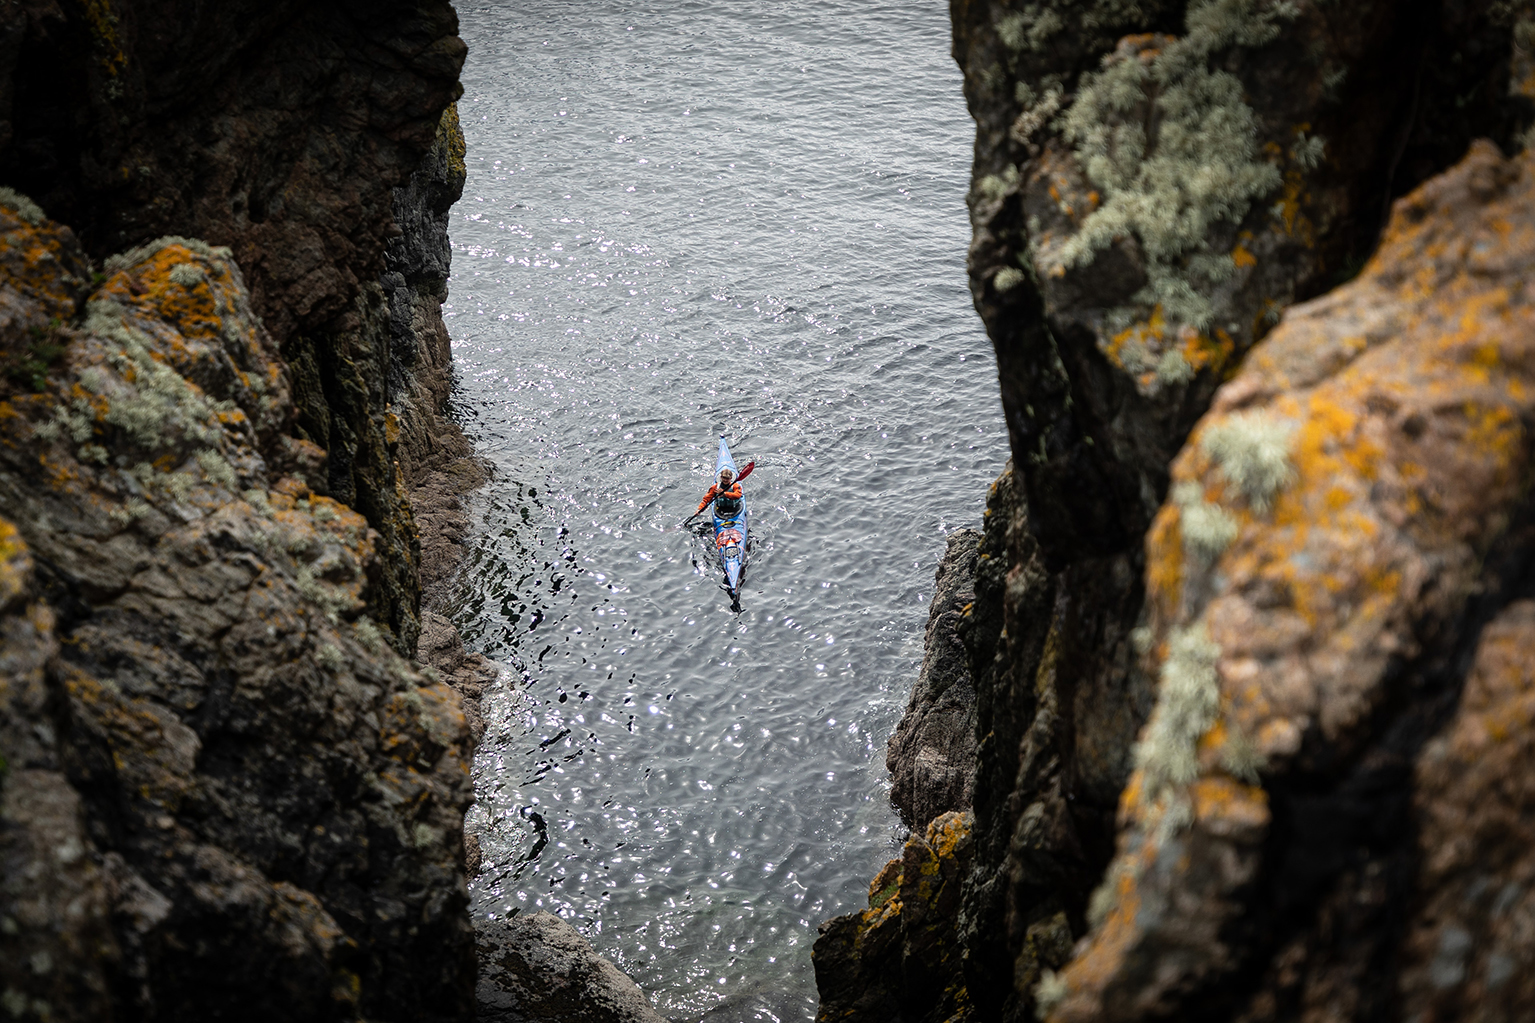
At its core photography is about telling a story. The perspective and how you take your photograph will dramatically effect the influence it has on the viewer. Above is a good example of the same photograph taken from two differing perspectives. The first is a ‘classic’ bow shot telling the story as the first person and their view of the geo. The second is shot from above framing the kayaker within the landscape and offers a sense of scale of the paddler in their surroundings. Neither are right nor wrong, but show how creativity can be used around an image when sharing a story. Below are a few of the main methods I’ll employ when capturing my adventures in a sea kayak.
The Classic Bow Shot
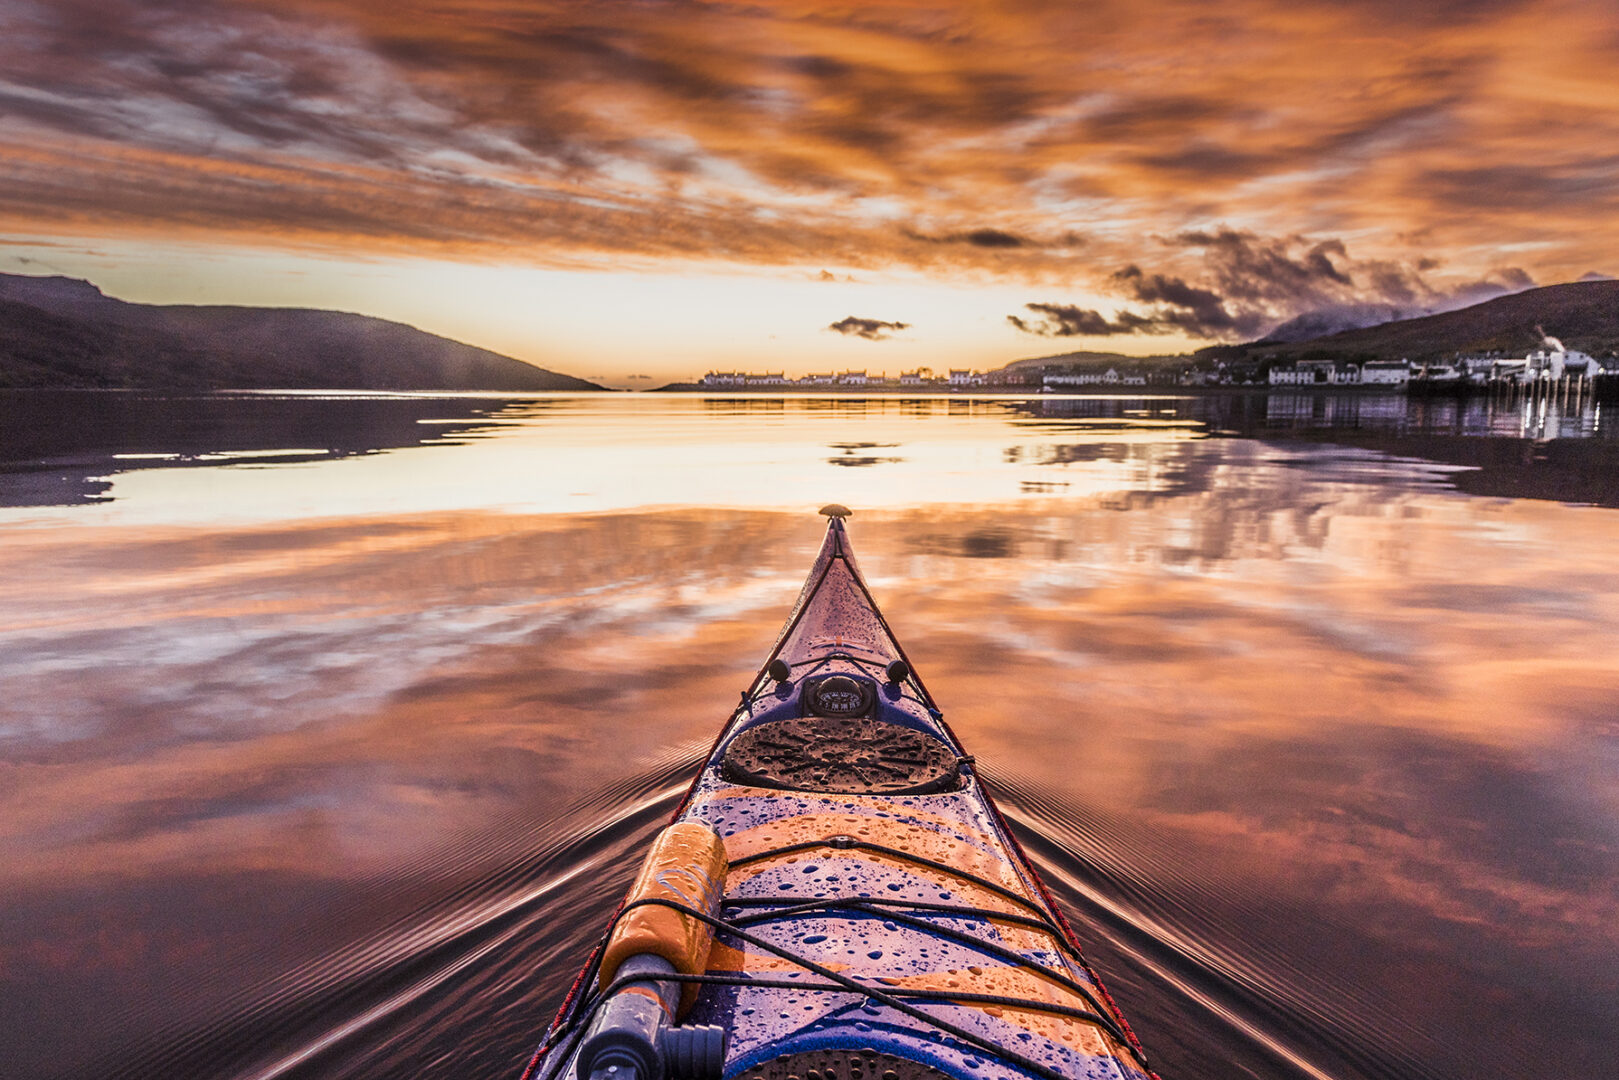
The bow shot is the most iconic of kayak images. This classic perspective is a tried and tested angle that works wonderfully at conveying the perspective as seen by the paddler on the water. When used appropriately and in moderation it is a wonderful way to frame a kayak photo.
Bow Shot Top Tips
- Wet your bow – This was a tip shared to me by the ‘bow shot legend’ Thomasz Furmanek from Norway. A quick splash of water across your bow will hide any scrapes or marks and simultaneously give a clean and glistening look to your boat.
- Understand Aperture. adding extra depth of field to your camera will help maintain the bow and the background sharp. Lowering it will draw focus to the kayak itself.
- Consider camera height. A lower camera angle will emphasise the scene beyond the bow but make the bow appear wider in the frame where a higher angle will give a sharper, narrower looking bow. Generally I tend to shoot from around head height, giving a first person and natural looking perspective. Try and avoid the bow intersecting the horizon line or any distracting object as this will look messier as an image.
- Add some momentum. Before taking the shot take a couple of strokes forward. This will add a pleasing wake across your bow line.
- Line up your picture. Whatever the subject matter ahead of you try your best to line this up to the tip of your bow. The bow is your leading line to your subject.
- Action cam tip: When shooting a landscape from an action cam they work best in flatter light. Just before or after sunrise or an overcast day yields the best image results, in my experience.
Creating a sense of Scale
Moving away from first person perspectives, the most dramatic kayak images in my opinion place the paddler within their landscape. There are many ways to do this. Below are a few good ways to go about it but first. Here are three examples of the same image taken using three different techniques.
Which is your favourite?
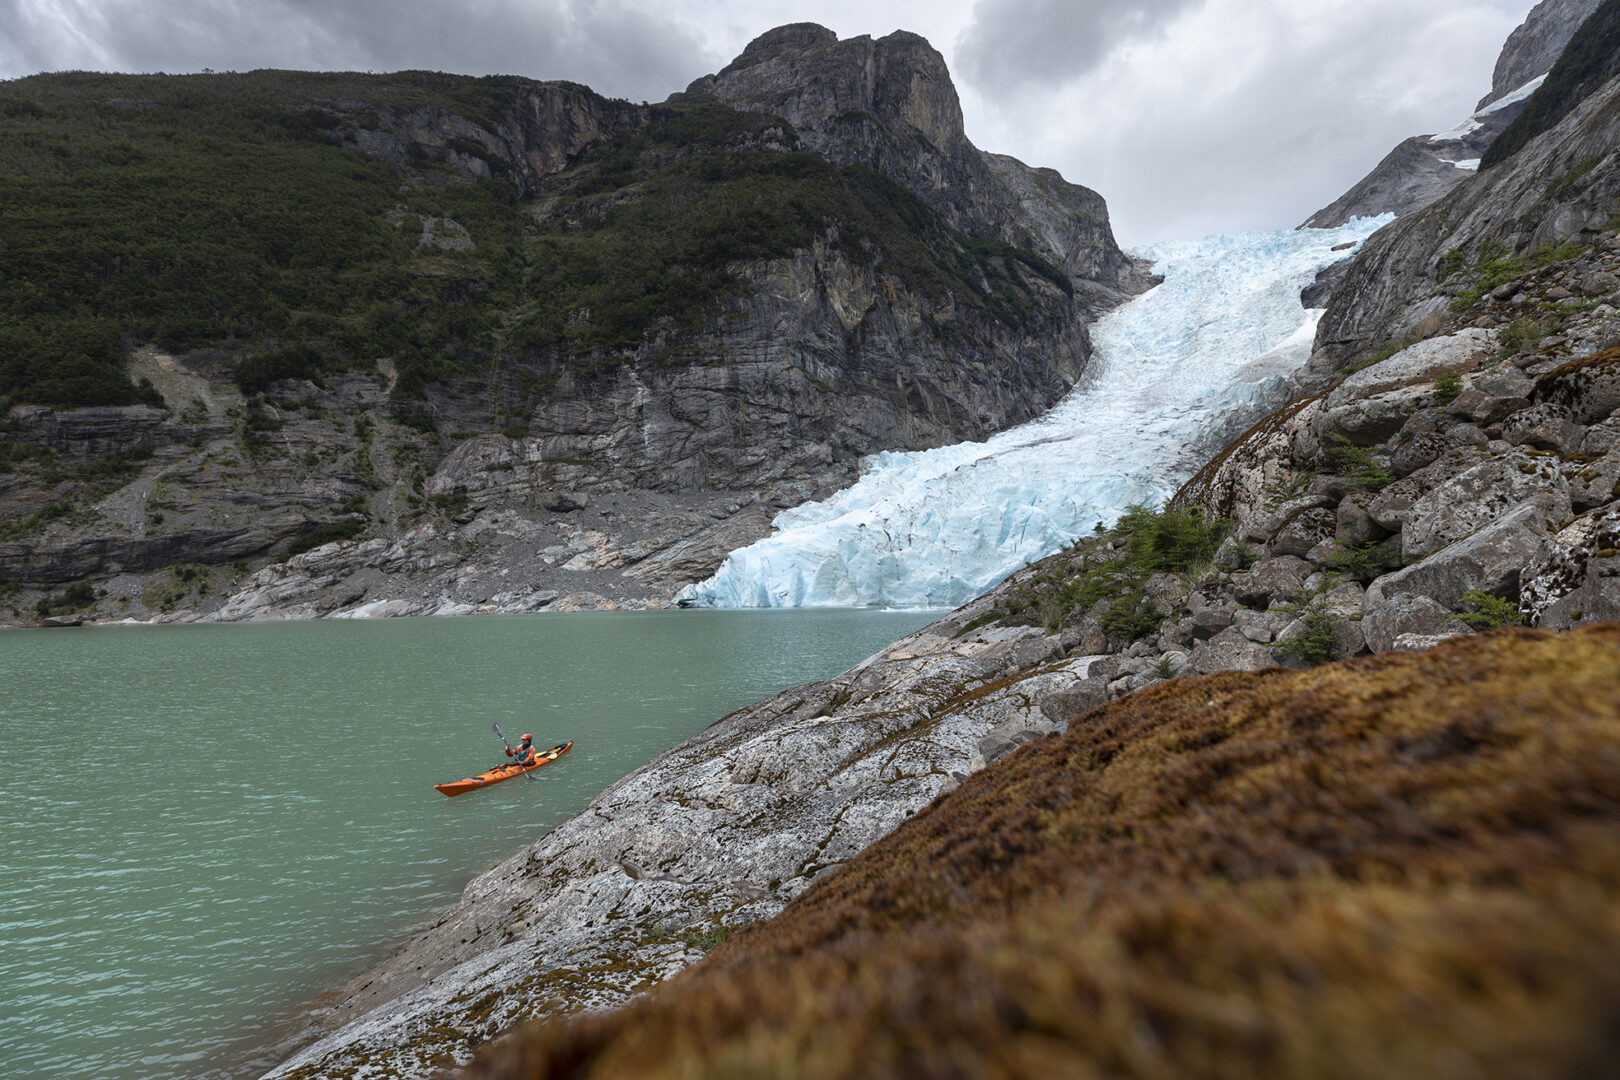
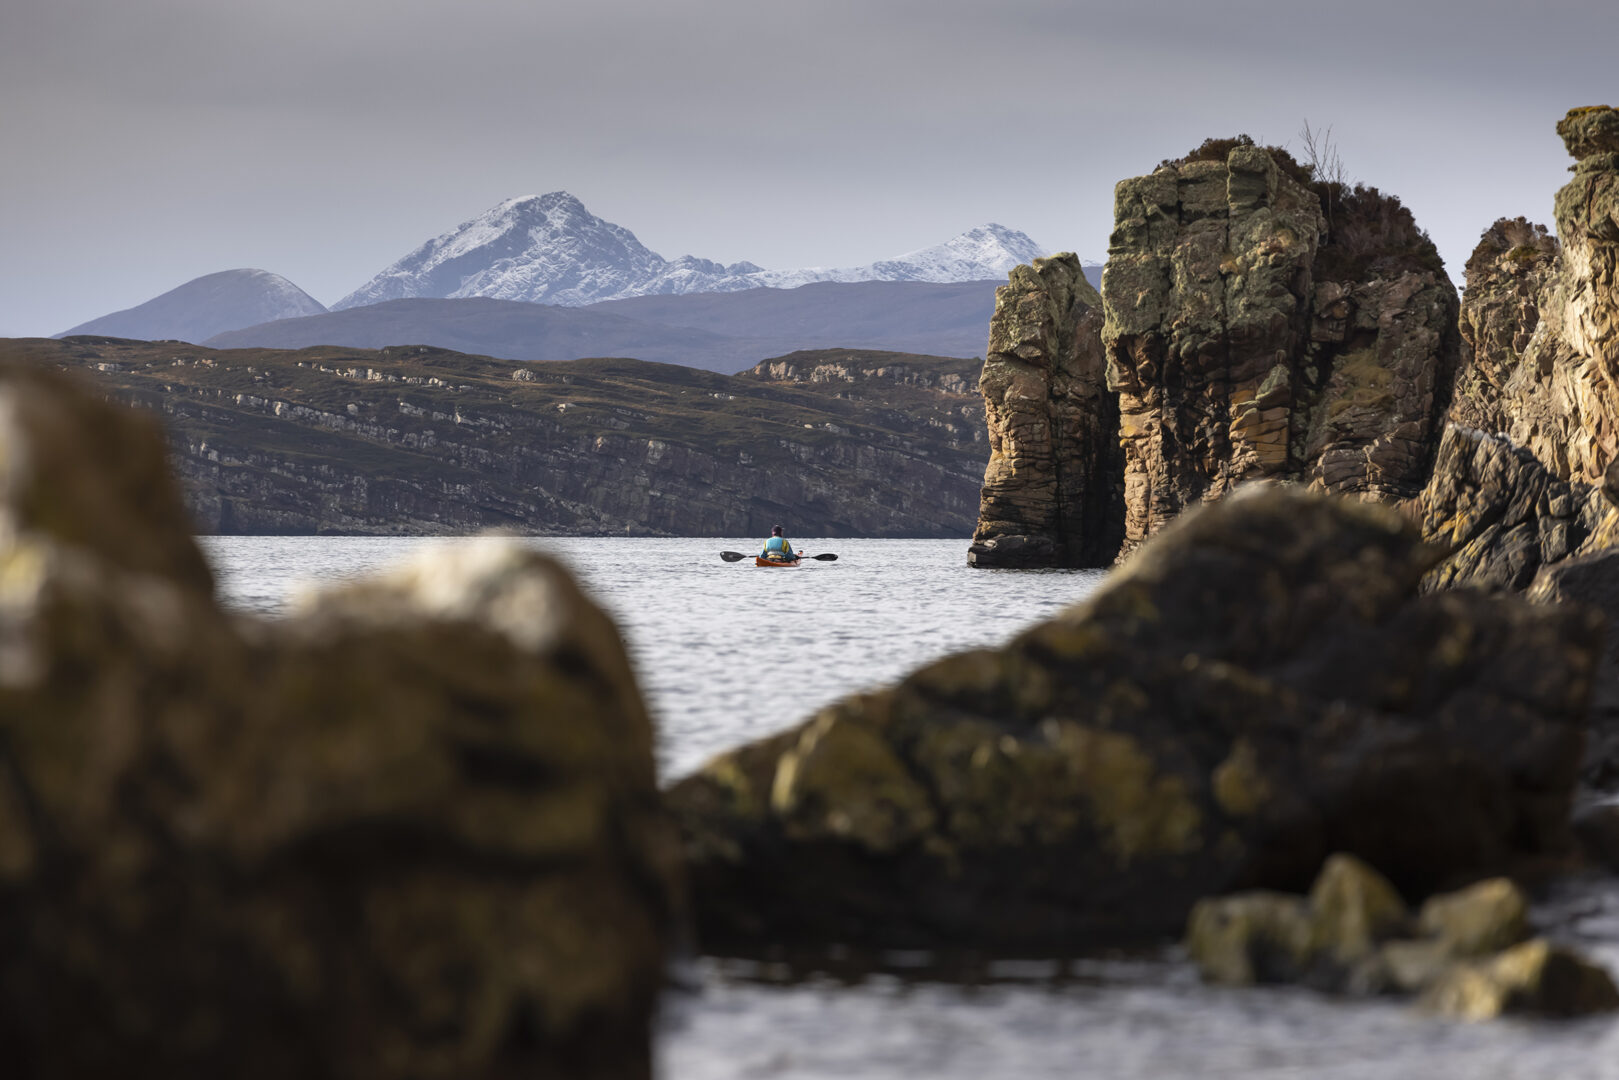
Zoom & Lens Compression
The sea is a big open space. Creating a sense of scale between a paddler and a feature on the horizon is often a challenge. By using a telephoto lens, or the zoom on your phone we can compress the foreground and background together. The result will be a more dramatic dynamic between the two.
Personally my most favoured lens when shooting from my kayak is my canon 70-200mm f2.8 telephoto lens.
A good understanding of lens compression is a valuable skill to learn. In simple terms; as zoom is applied it squashes the perceptible distance between the foreground subject (e.g a paddler) and the background subject (e.g mountains). This effect can be used to create a sense of size and scale in a landscape or to draw the paddler nearer to a subject that may not be safe to approach.
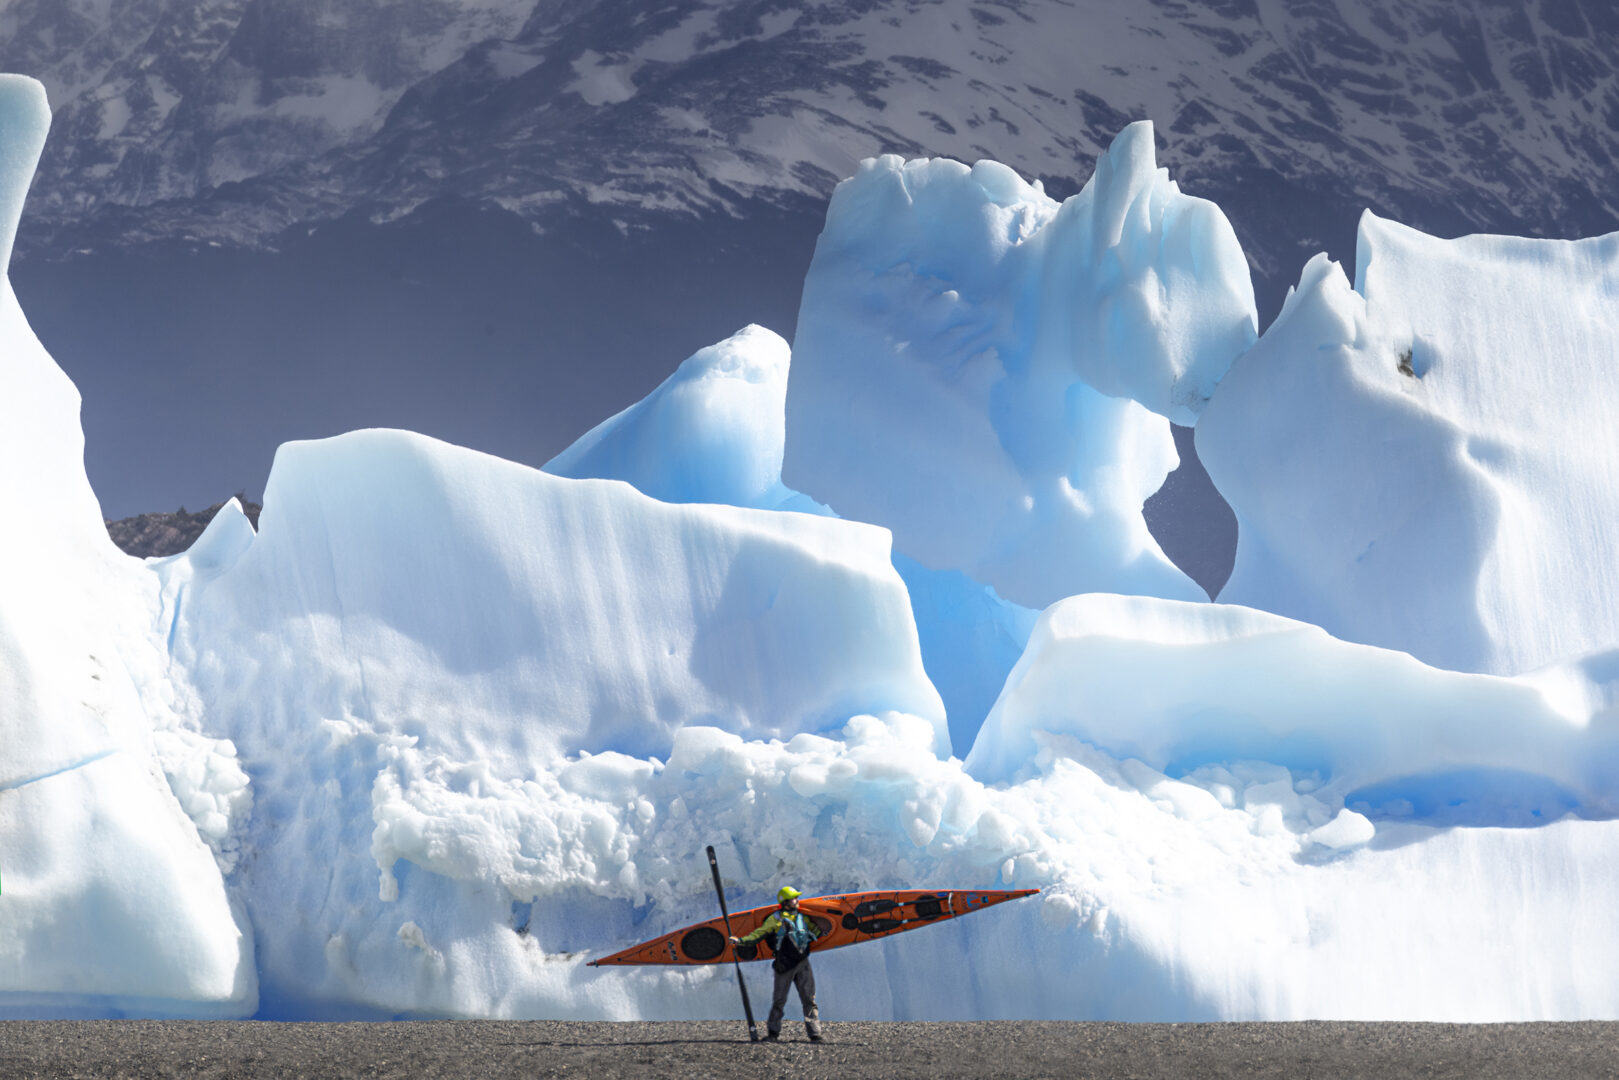
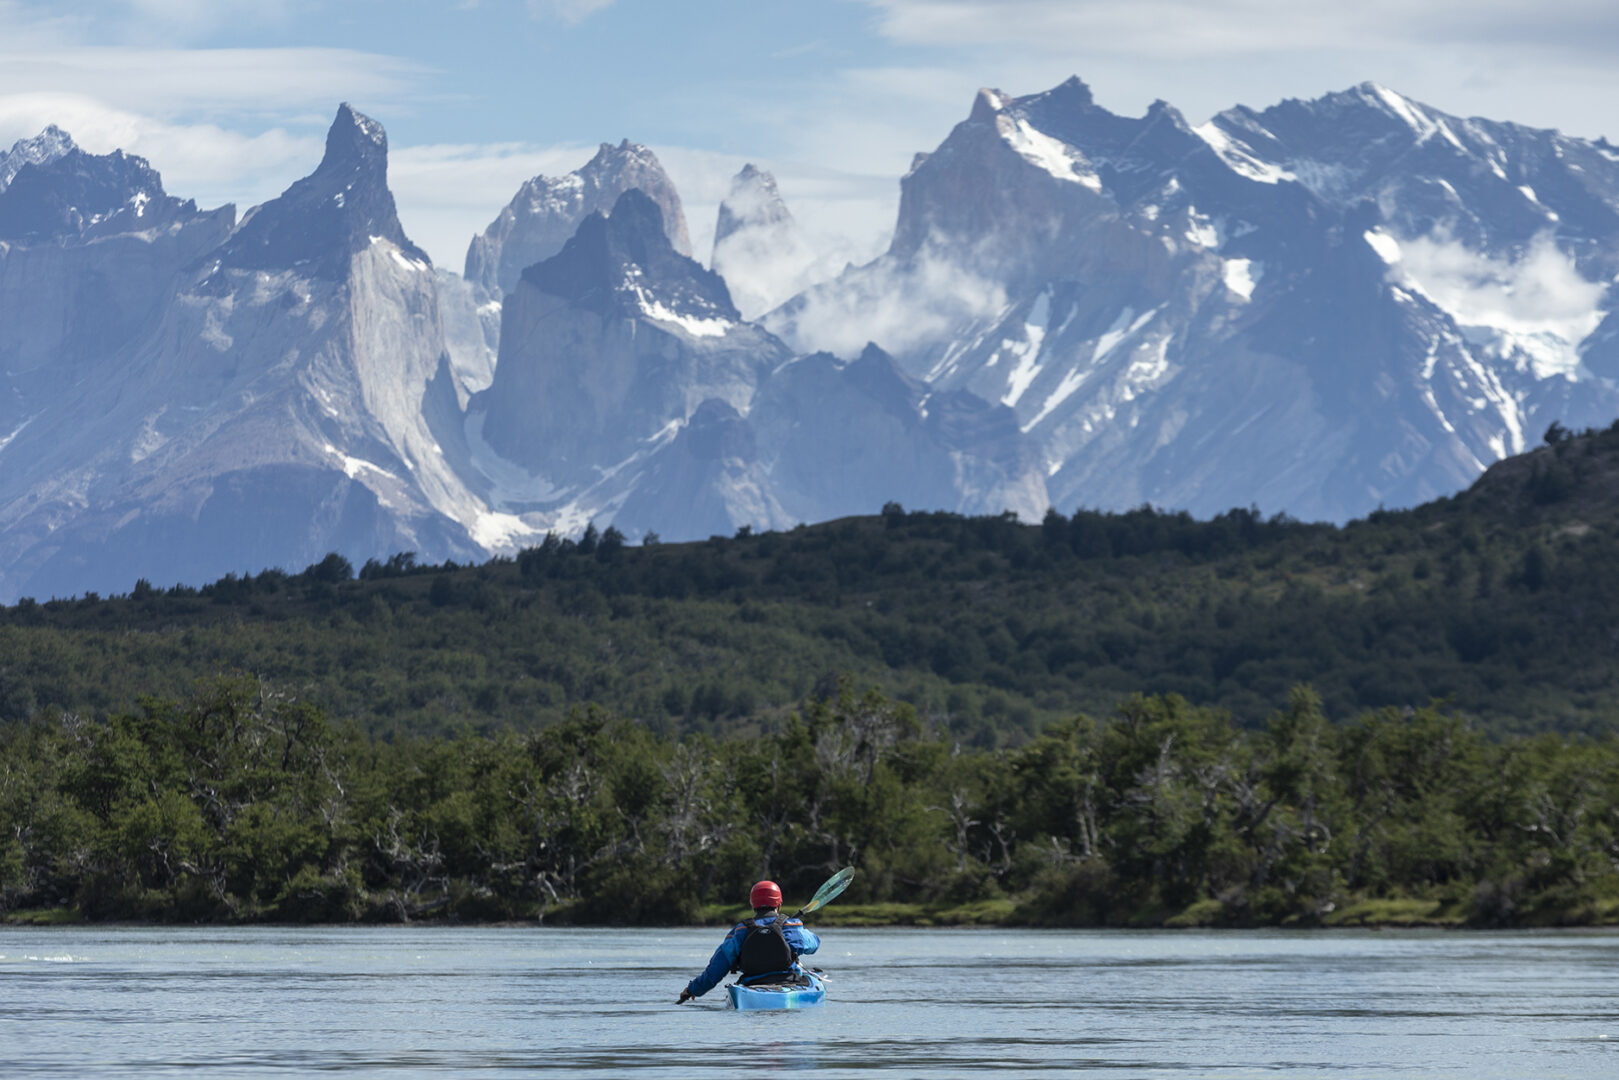
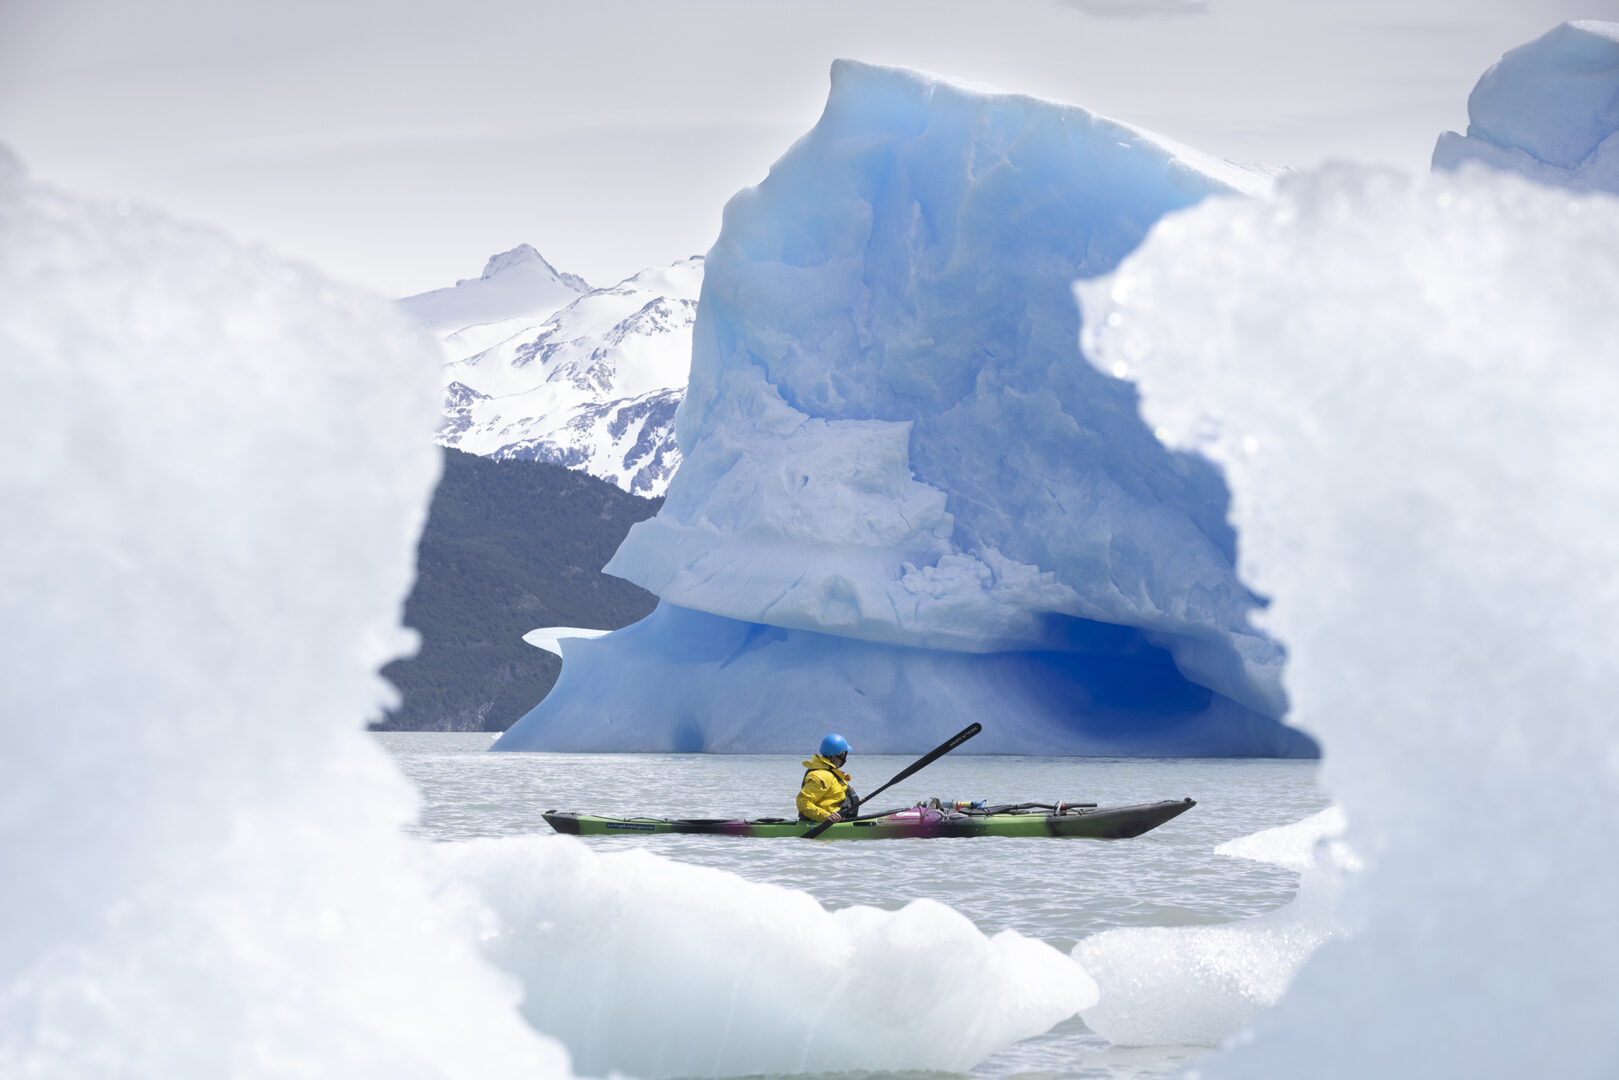
Below are three examples of lens compression used from a kayak.
- The first image draws the distant mountain closer to the paddler.
- The second reduces the distance between the paddler and the waves, allowing the kayaker to remain in a safe position.
- The third creates the illusion the paddler is under the iceberg, when in reality the kayaker is almost 100 metres behind the iceberg.

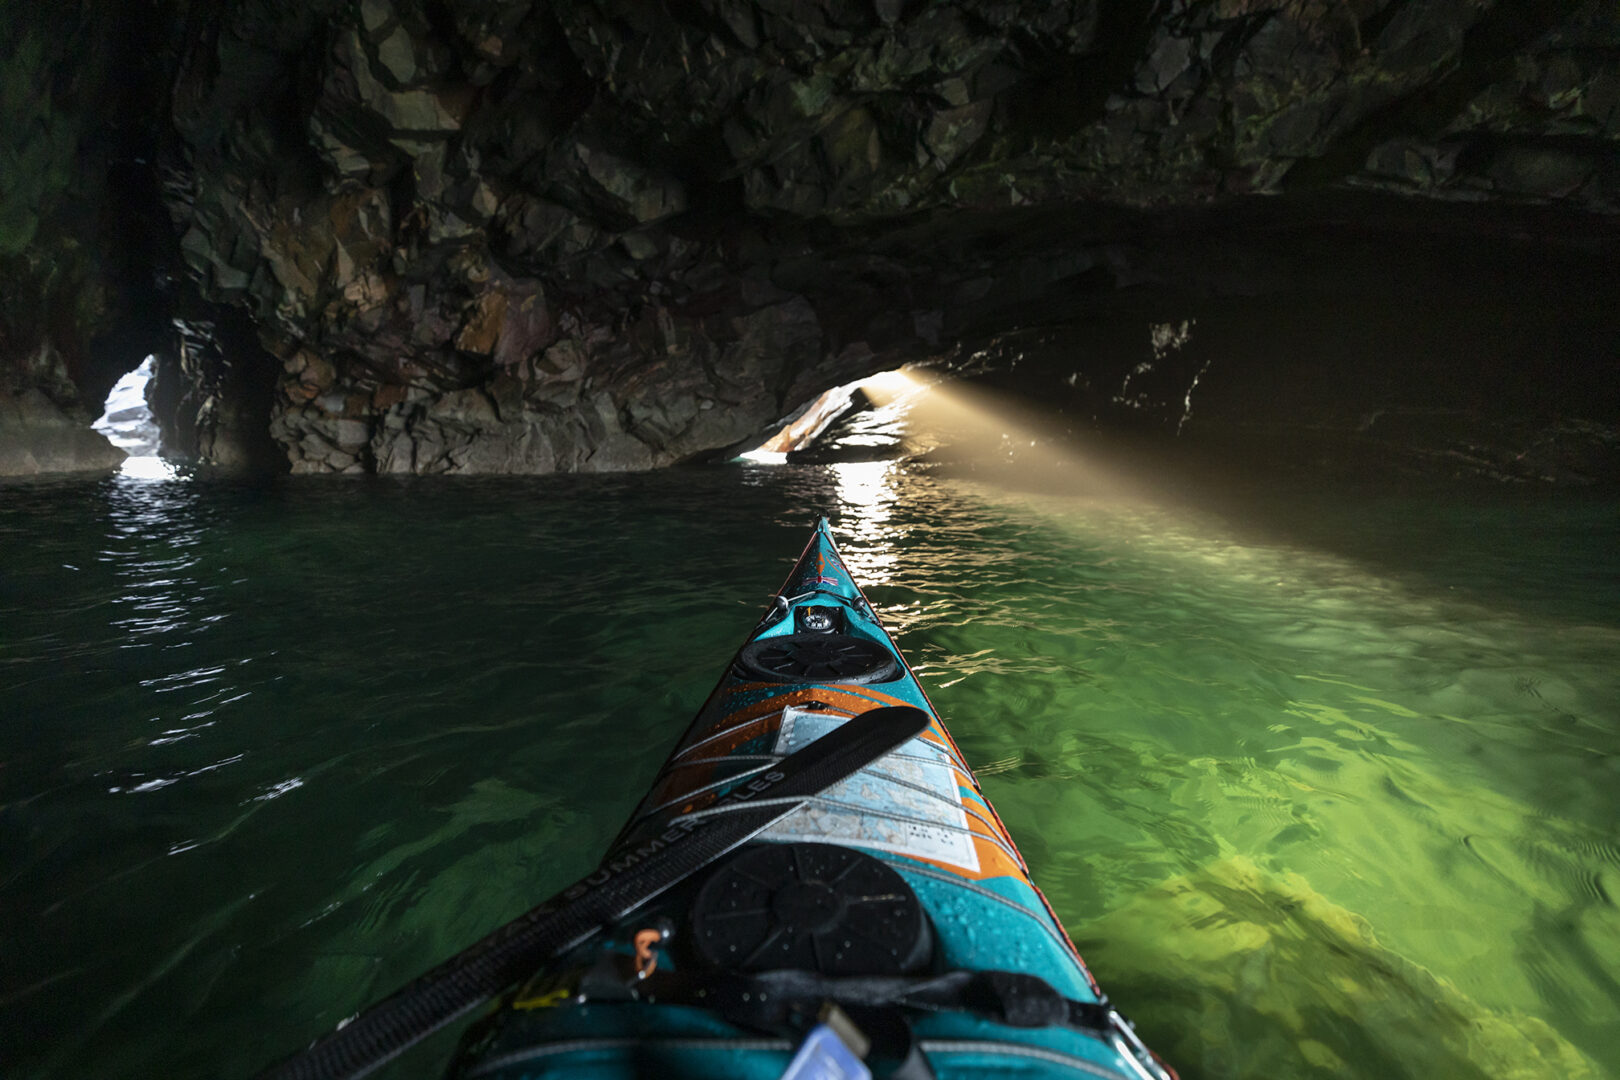
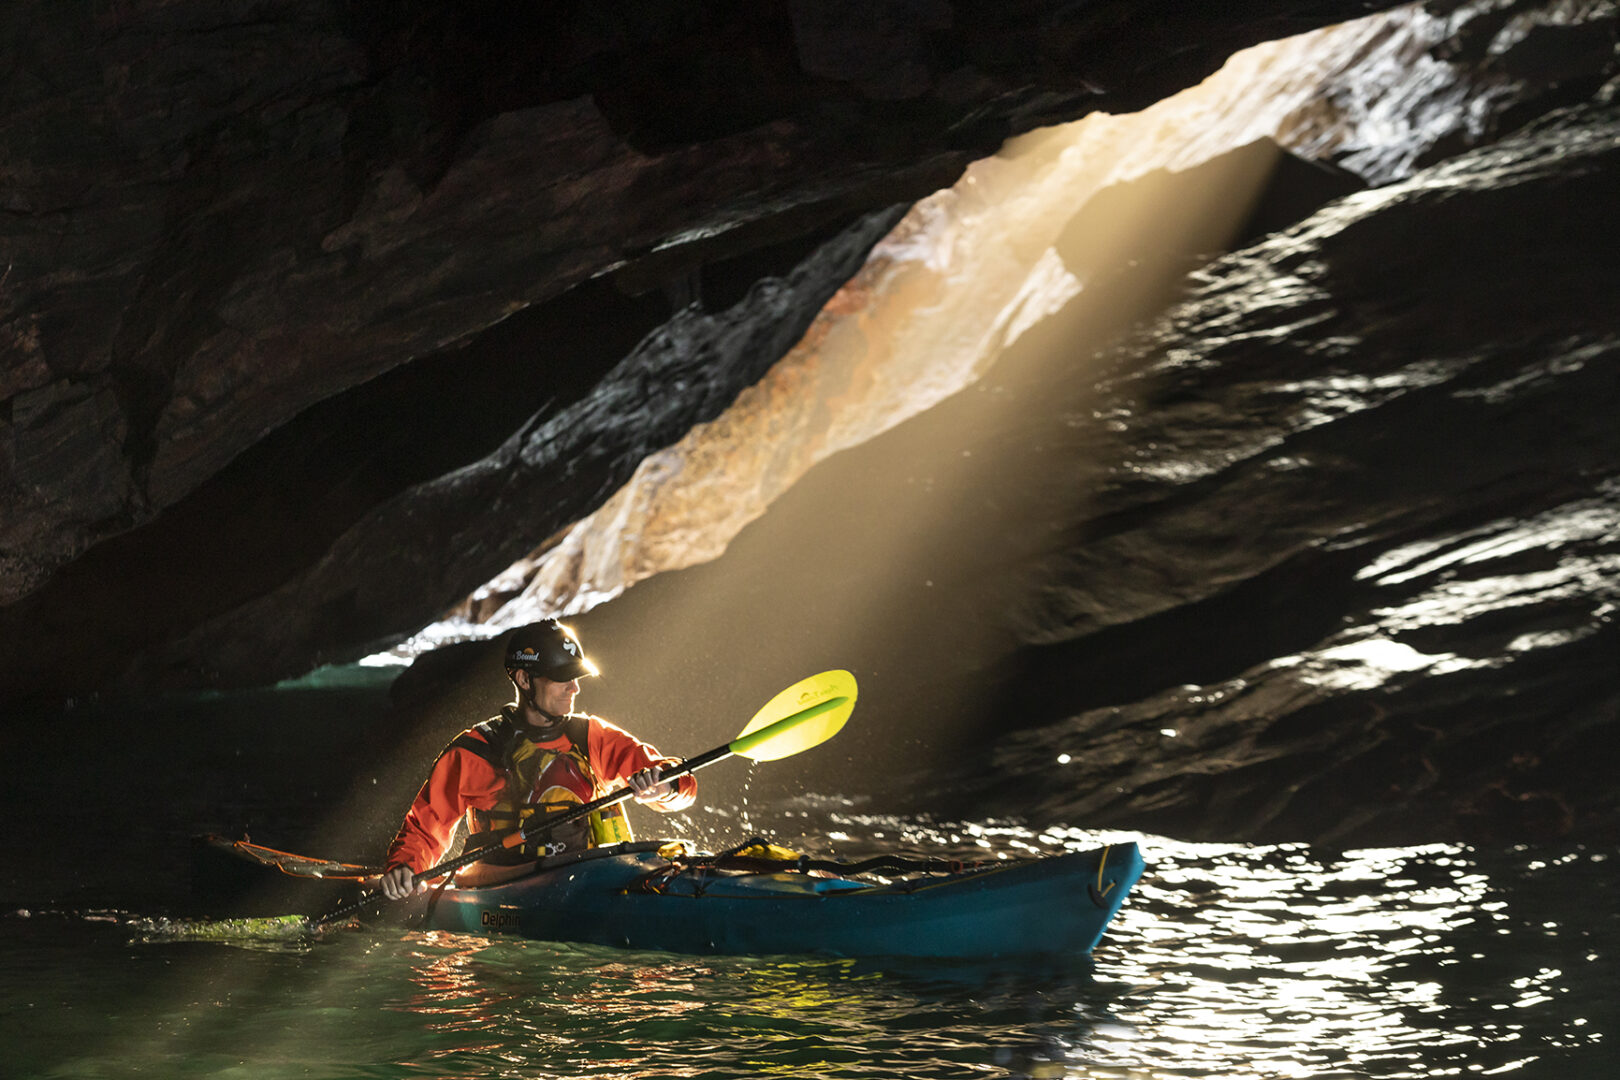
Wide Angle
A wide angle lens from a kayak can have variable use. Shot at sea level it will create a sense of space or isolation and can also be used effectively to capture a tight or enclosed environment. Wide angles have a great time and a place in story telling on the water. The use of action cameras is often a wide-angle format too and is a great way to capture up close perspectives from the paddler and their surroundings. Below are three examples of these.
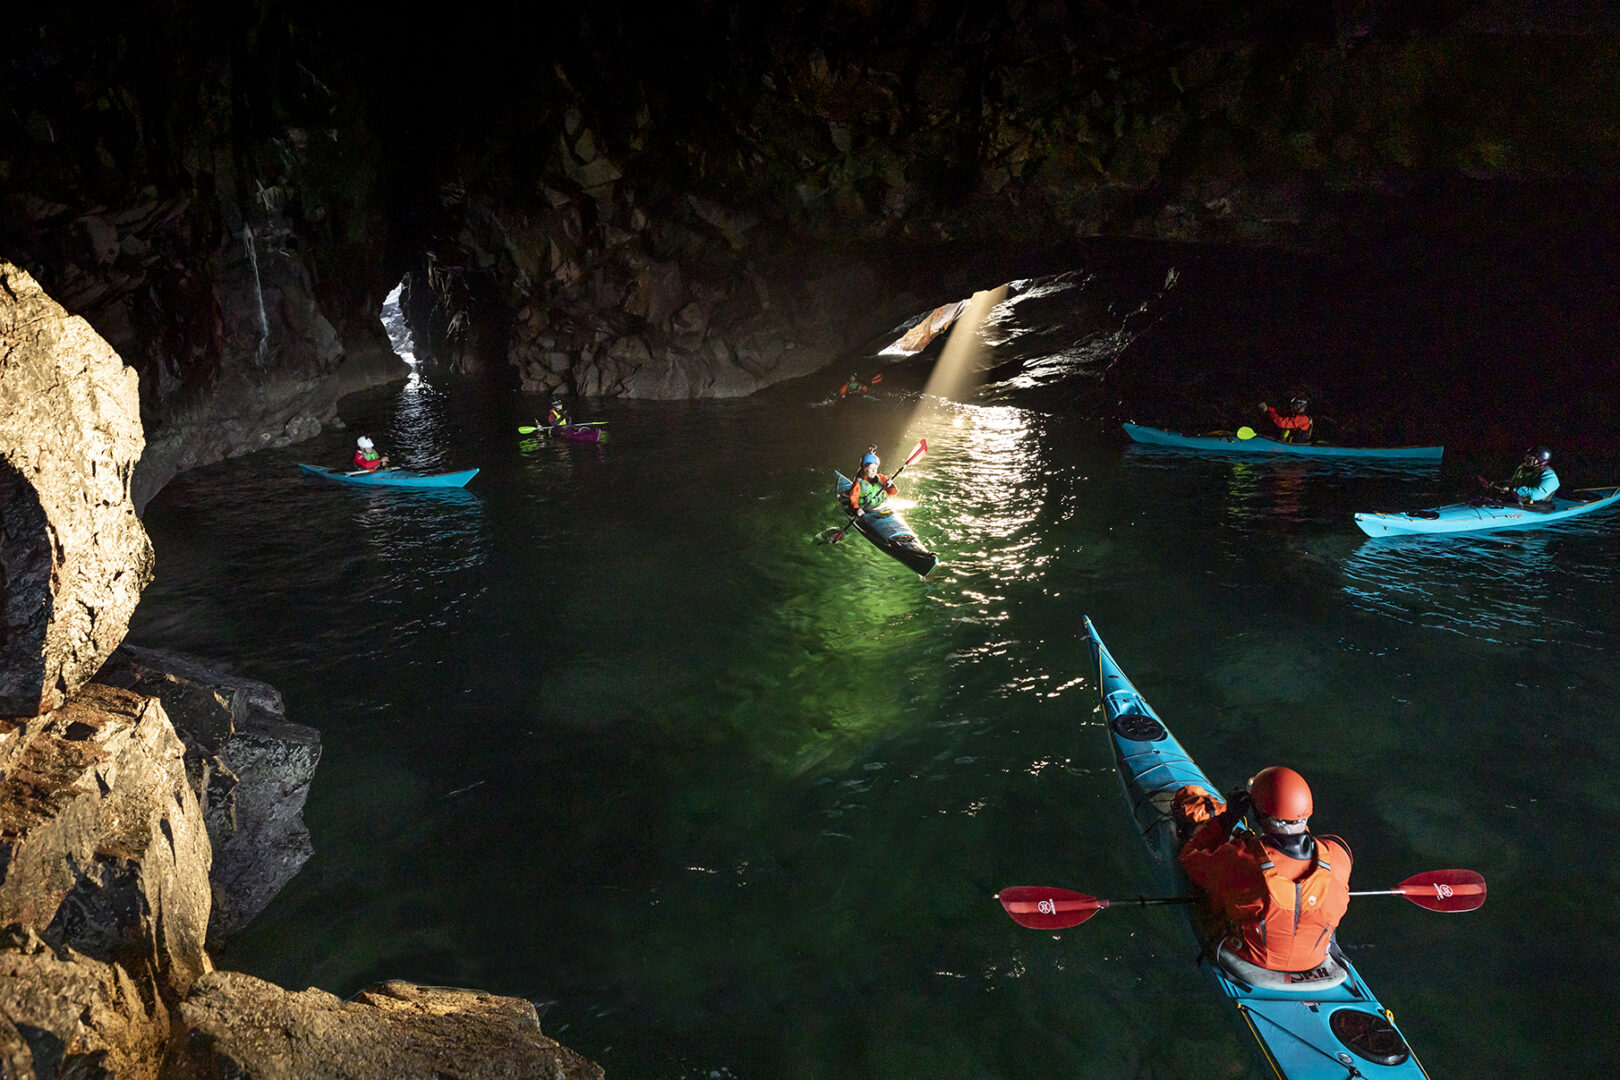
An excellent use of wide angle photography is to gain a little altitude above the subject. This gives a wider perspective of the foreground in relation to the background scenery. A small kayak from above makes a wonderful subject and can produce a sense of scale that is otherwise hard to create from the water line. Drone photography has amplified the ability to do this, but there is no substitute for creatively looking at your surroundings for vantage points to photograph down to from land above. To make the best results of this the subject wants to be in the near third of the frame, with the landscape in the top third.
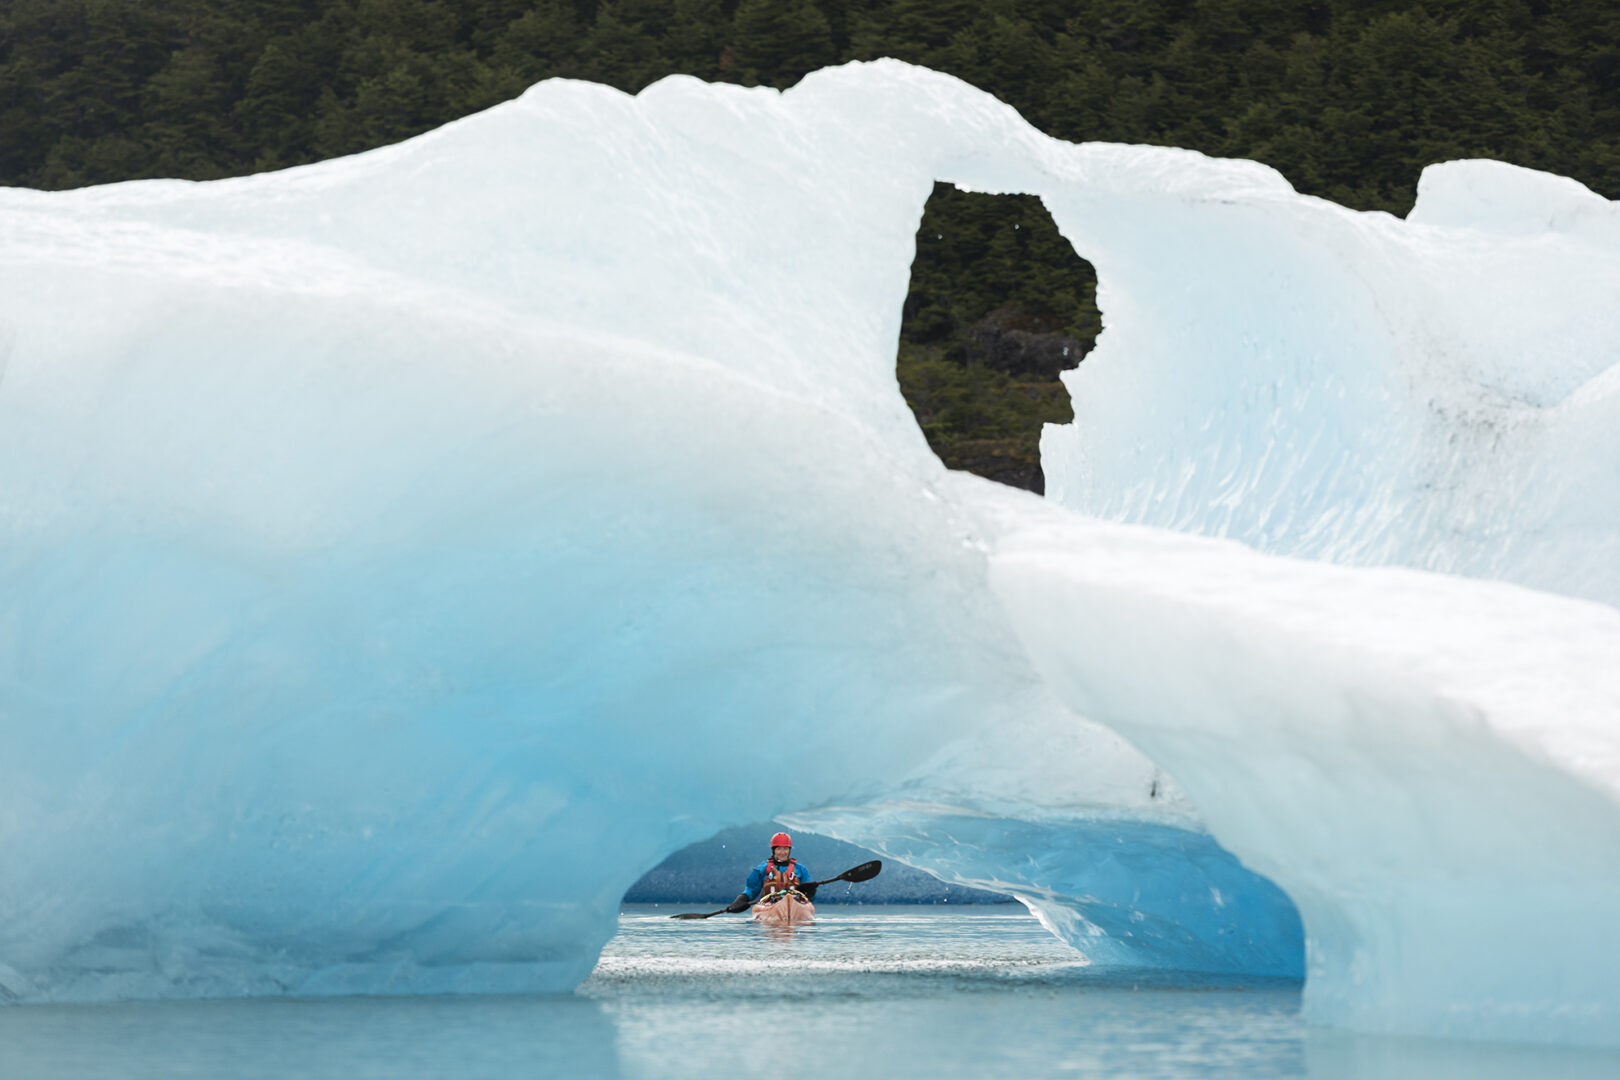
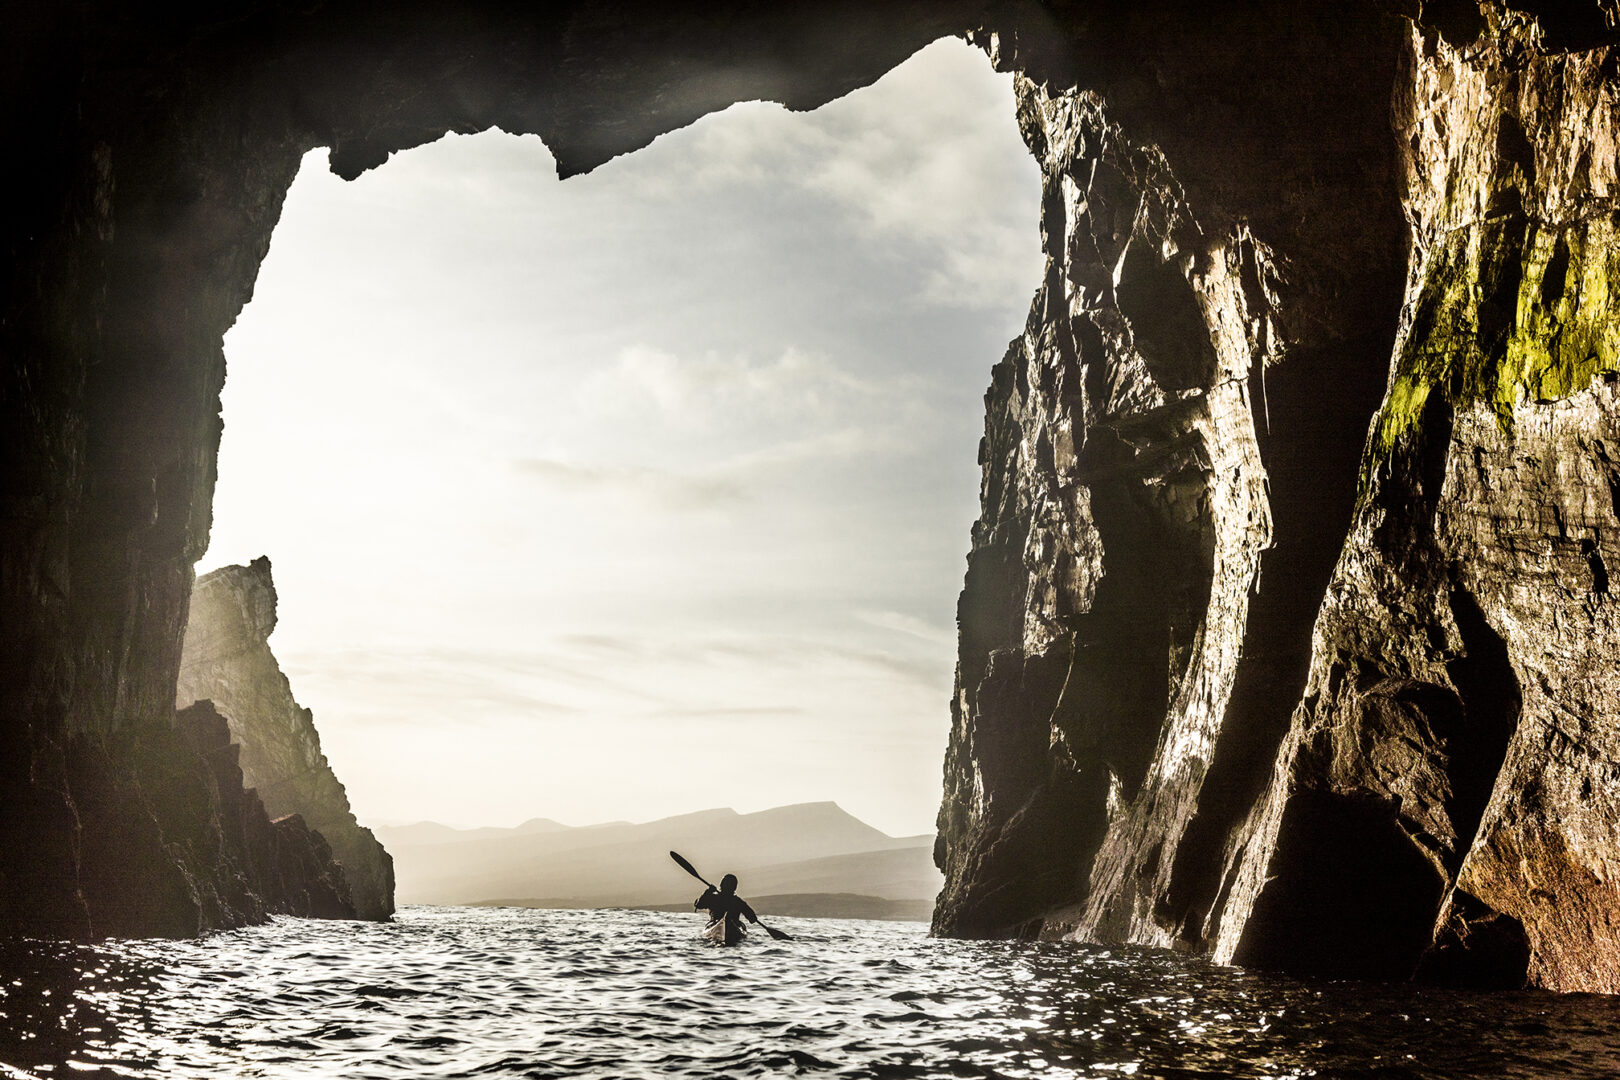
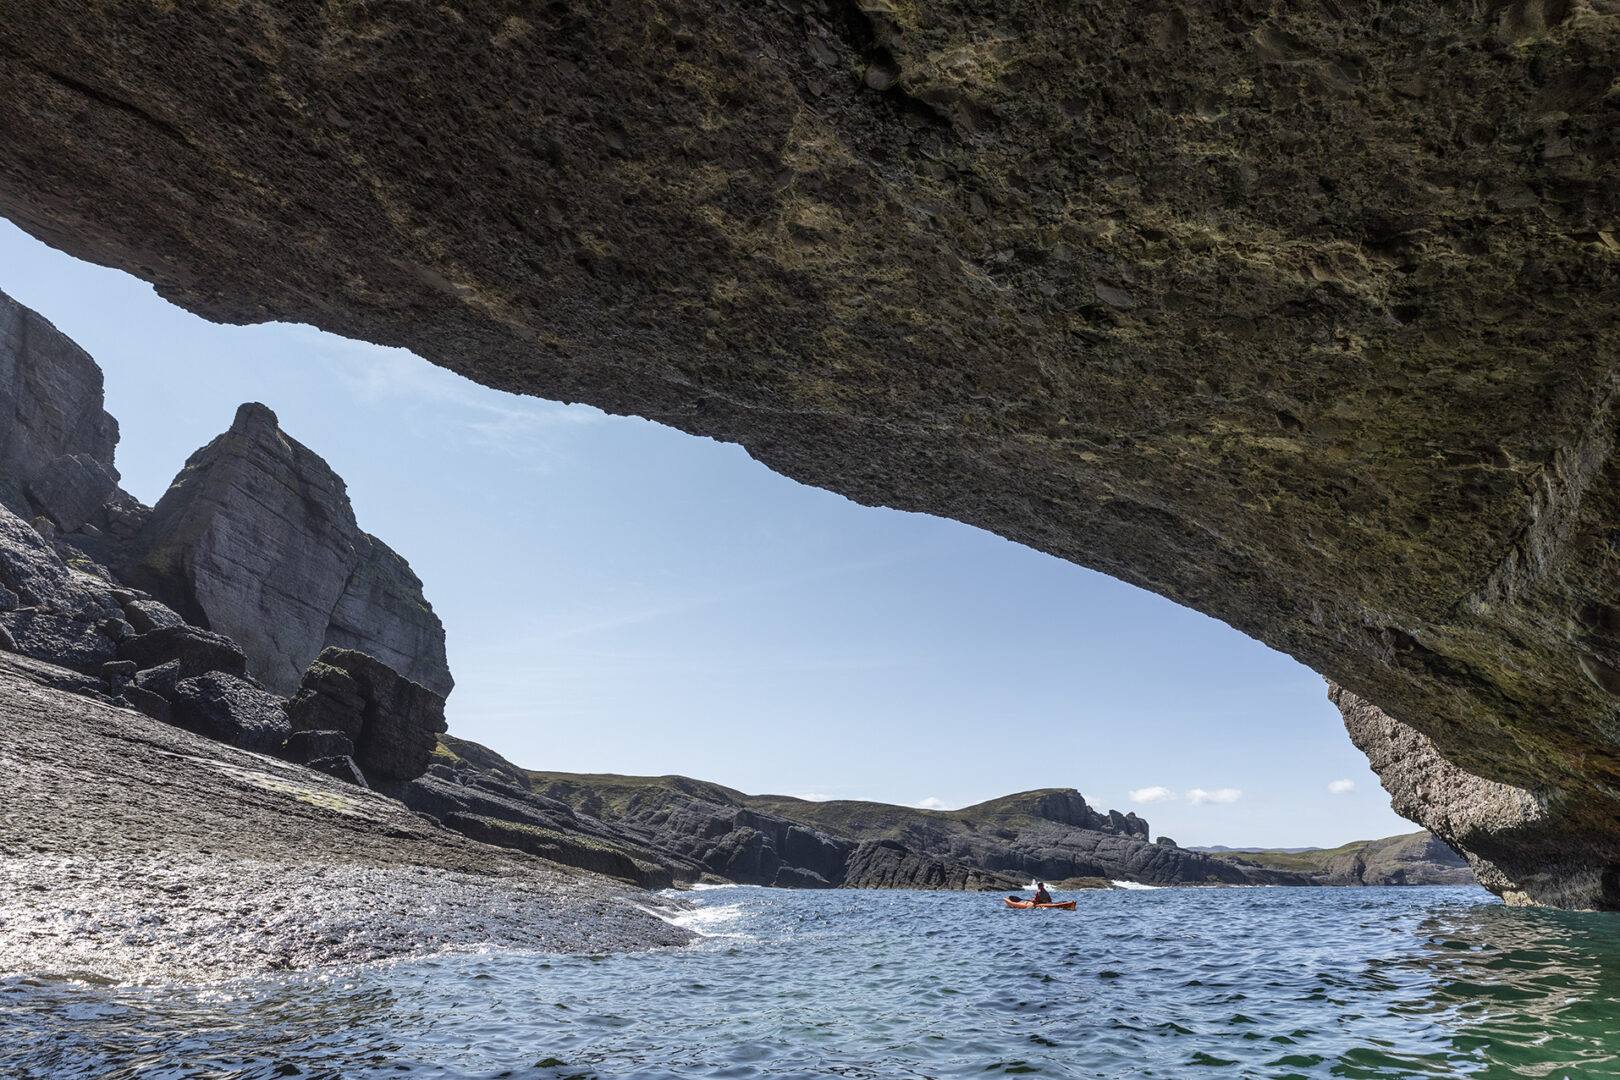
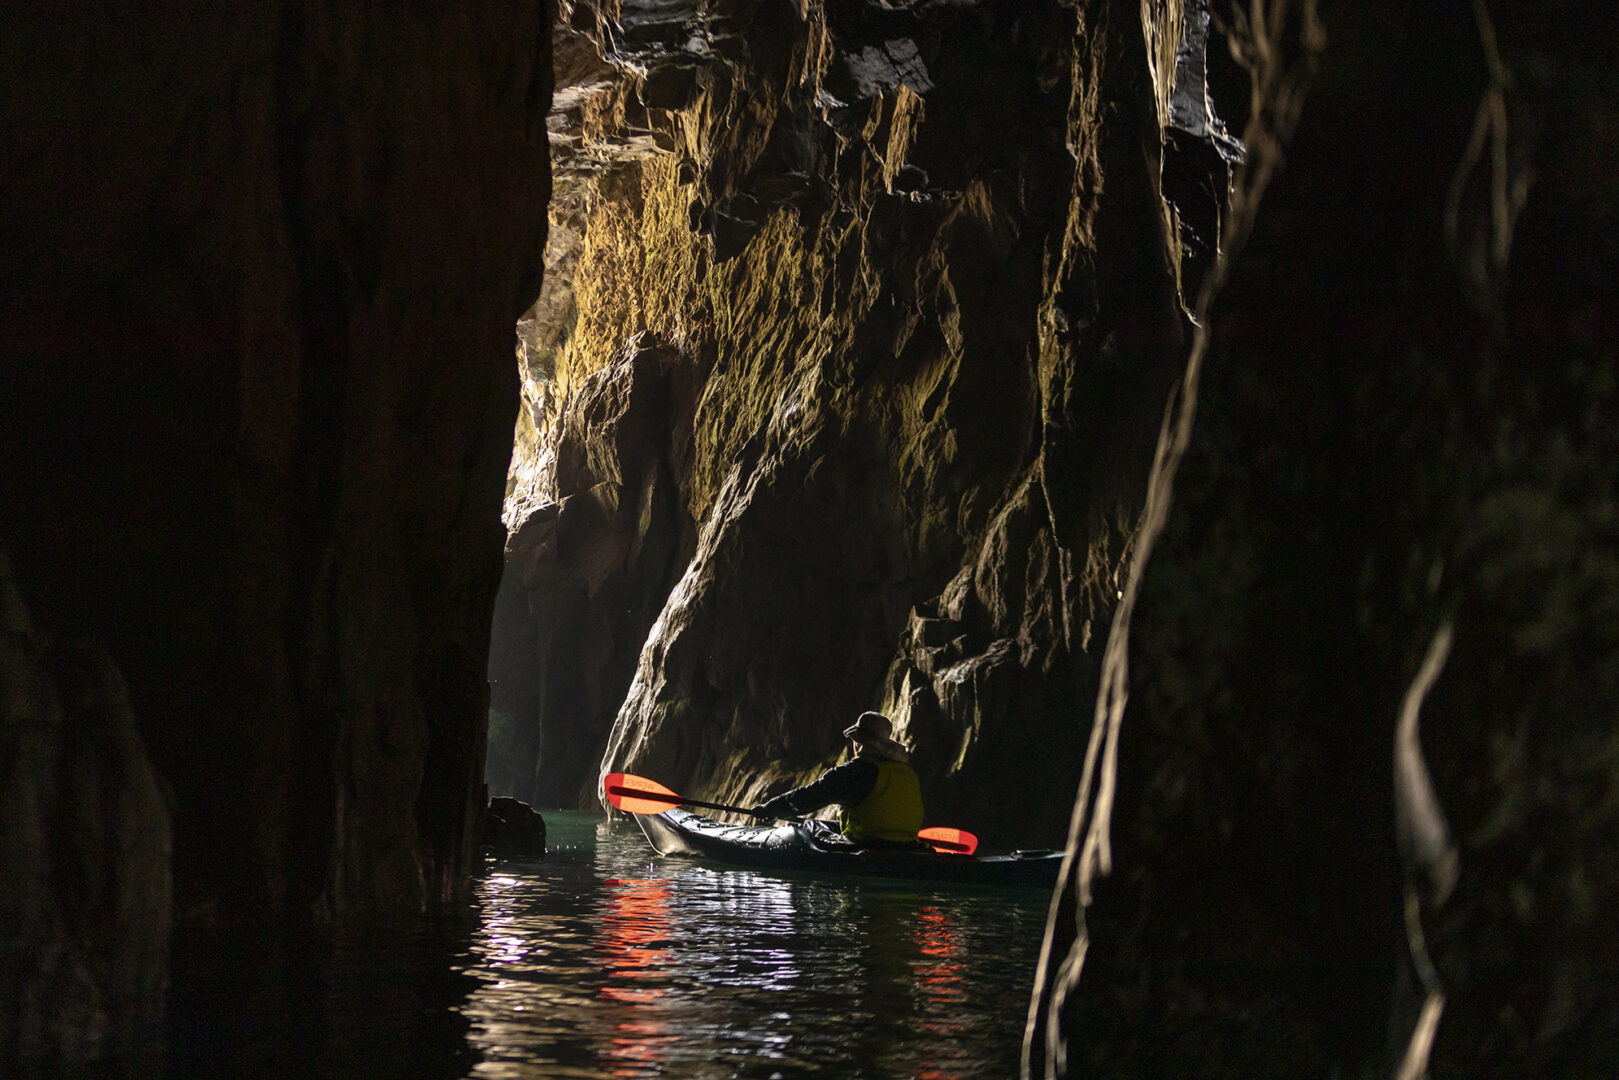
Natural Framing
Using your surroundings to add depth to the subject is a powerful way to add depth into your images. As a kayaker this can be a fantastic game, whilst on the water keep an eye for features that you can use to frame your subject around. By combining this with the above mentioned lens compression it is possible to create an image with a wonderful sense of scale and intimacy to the landscape. This can be done using waves, rocks, trees, ice, other kayakers and more. I like to think of my images as a three piece collage of a Fore-ground, subject and background, if all three can be used a great image is easier to achieve.
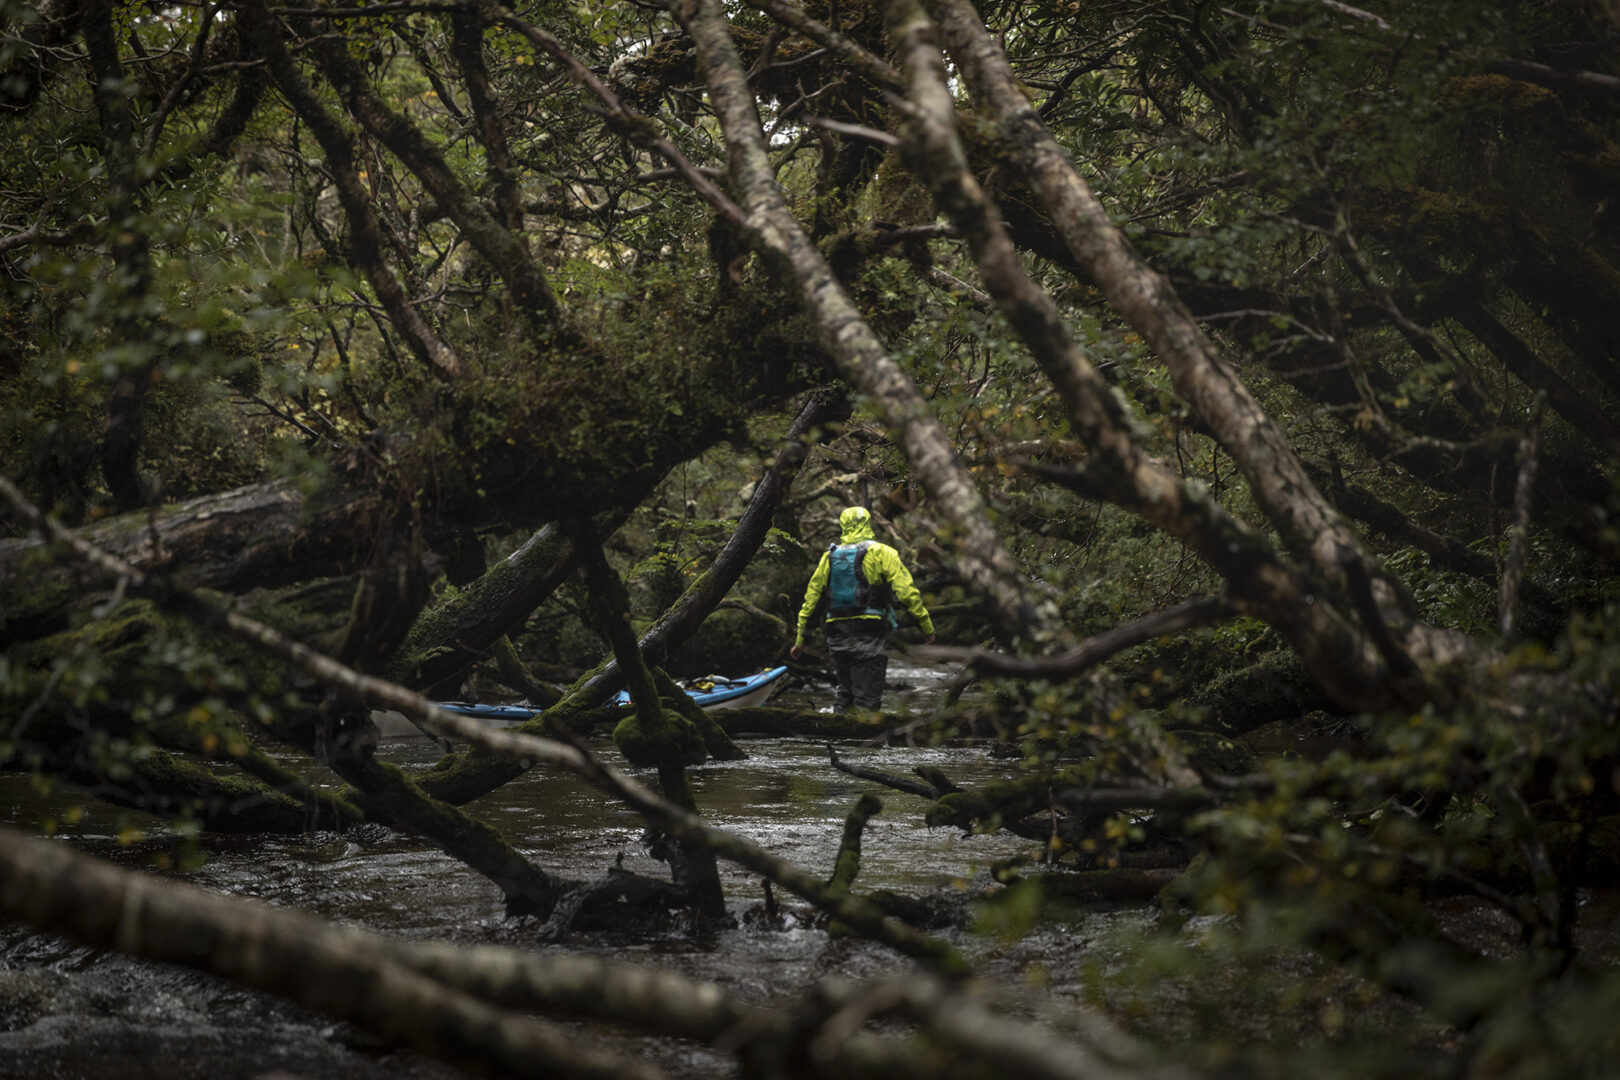
Shooting in rough weather/water
Quite often the greatest stories from a kayak come from the conditions where you are pushed to the edge of your comfort zone. First priority will needlessly become your own safe wellbeing, often at the cost of the ability to capture it. When it is possible it is perhaps the most rewarding of all.
Shooting on the water
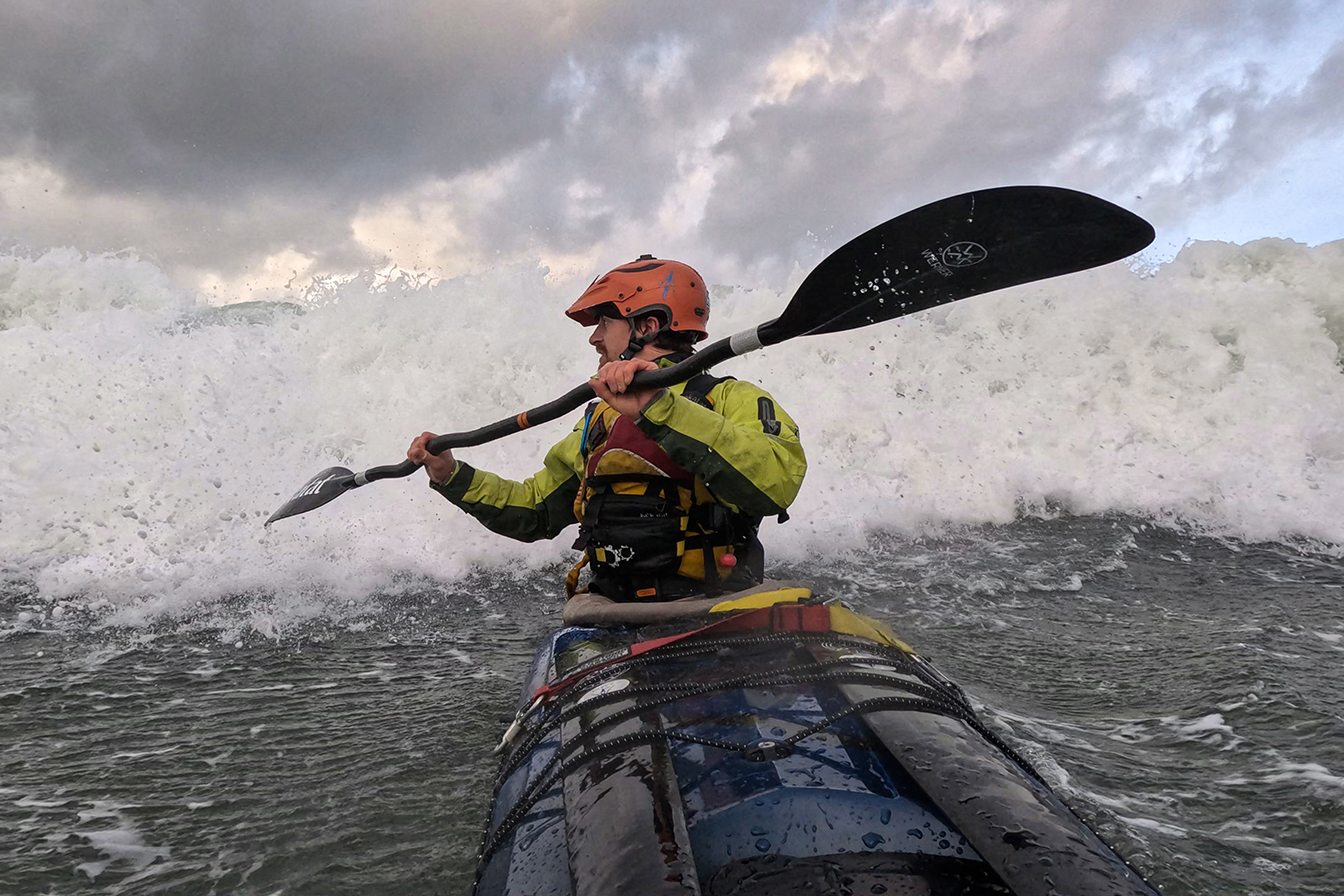
If shooting from the kayak, fundamental understanding of your kayak and how it handles in conditions is essential to be able to draw your hand from the paddle and onto your camera. This too comes with a heightened risk of capsize and needless to say higher risk to your camera. If you are not comfortable to take your hands off the paddle, then an action camera provides a good solution. Personally I find in these conditions this is where I make best use of my drybag between my legs. The image below for example is shot on a telephoto as a burst of images over my shoulder, the DSLR is unprotected and did take some spray, my other hand was bracing the paddle crooked securely between my shooting elbow and with my other hand controlling the blade. In total 24 images were taken over a few second.
Shooting from shore
If in doubt beach out. Framing and focus is infinitely easier to do from the security of dry land, not to mention protecting your camera. This might require some purposeful paddling to gain ground ahead of your subject, or to catch them up afterward. Ideally, communicate with your subject to give you time to set up your shot. When shooting from shore for rough water it is beneficial to use a longer lens. The lens compression will amplify the scale of the conditions and likely make a more dramatic image. If photographing surf or big sets it is beneficial to gain a little height, this will compromise the perceived height of the wave but give more time with the paddler in frame between the sets.
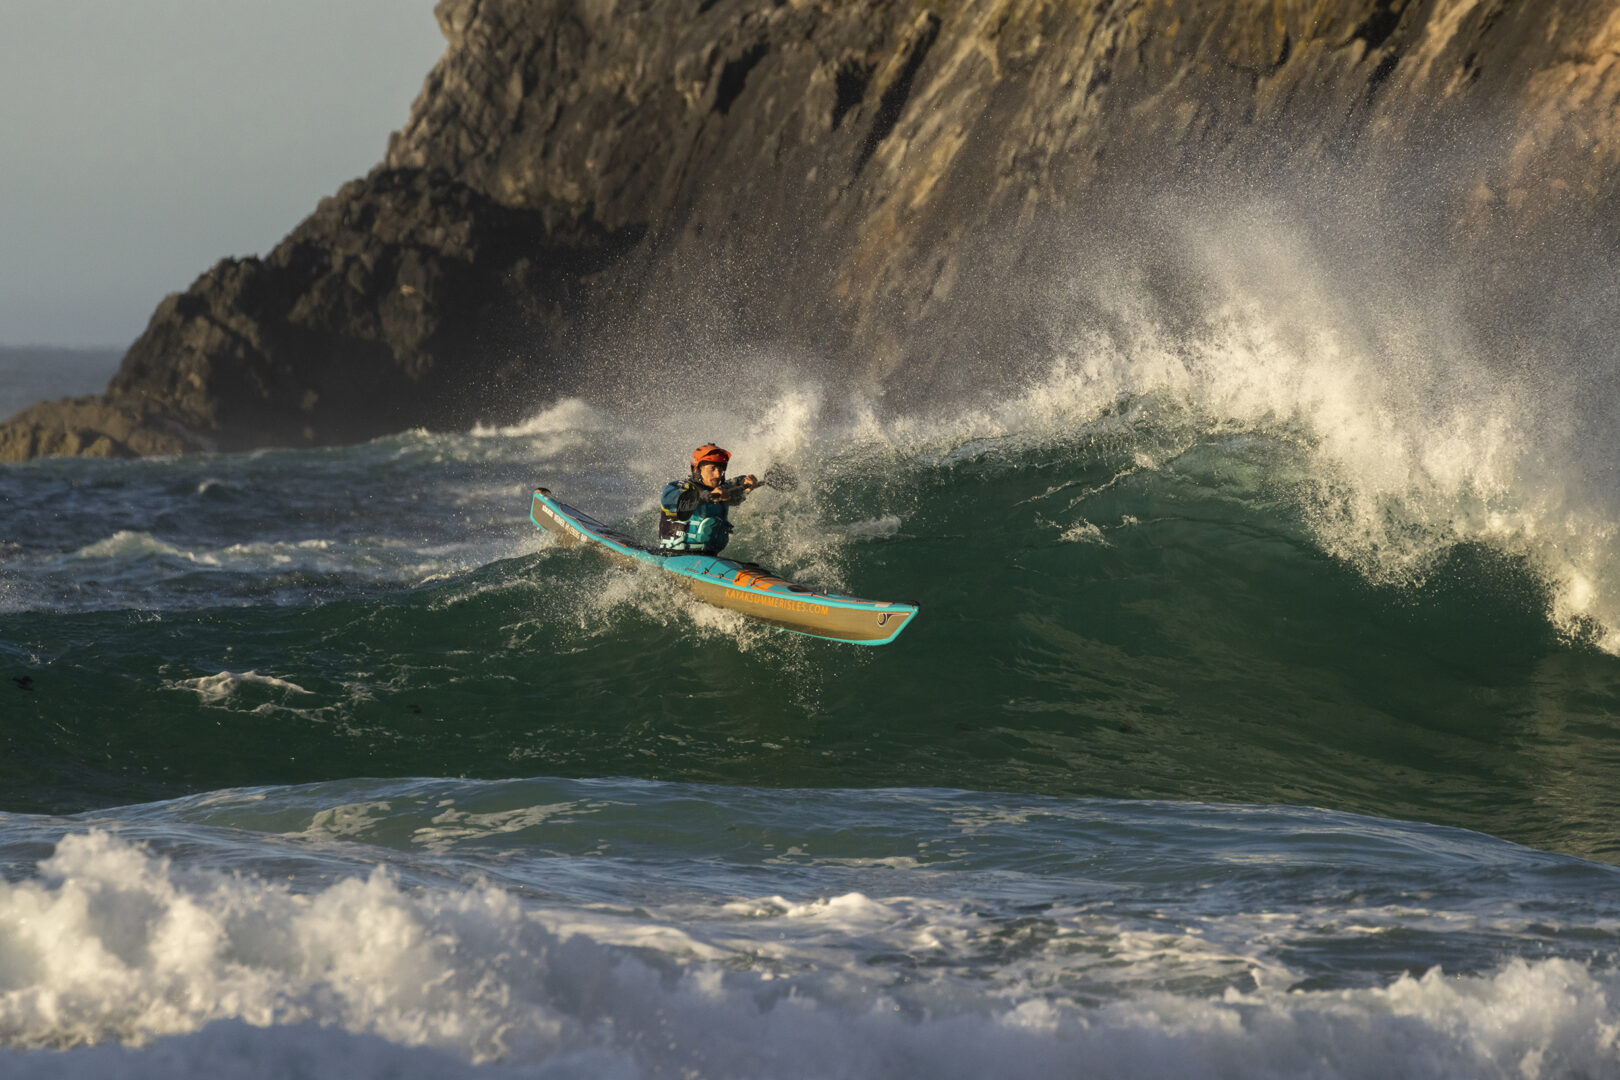
Rough Water Top Tips
- Stash your paddle well. Leaning back in the kayak, tucking the shaft of your paddle to your belly button then leaning forward will trap the paddle between your cockpit and buoyancy aid. This allows more hands free shooting. If you need your paddle, it is possible to grip it in the crook of your arm inside your elbow with your shooting hand.
- Spray and Pray. Unless you’re shooting film, in which case good luck! Take advantage of your cameras burst setting. The more images you shoot, the higher the chance one comes out with the focus hit in the right spot and the subject in frame. Quite often in rough water you will be shooting over a shoulder, or at an awkward angle.
- Boat position. If possible, align your bow to the subject. This gives you the easiest angle to shoot from and maintain control.
- “Apache eye”. – nicknamed after the unique skill developed by Apache helicopter pilots, this is an awesome trick to perfect. Keep both eyes open, one using peripheral vision down the eye piece to gauge frame and focus, while the offset eye looks along the barrel of the lens to line up your subject. This takes practice. The advantage of this is it allows you to track and focus on your subject whilst maintaining vision on the sea around you and keep far stronger balance. This trick also works wonderfully in fast tracking wildlife photography.
- Shoot Fast! When shooting action you want to adjust your camera to have a fast shutter speed. I personally aim for a minimum rate of 1/1000 to guarantee razor sharp shots. Of course this will vary depending on the result you want.
- If in doubt shoot from shore. It is rare that an image is worth demolishing a camera or swimming.
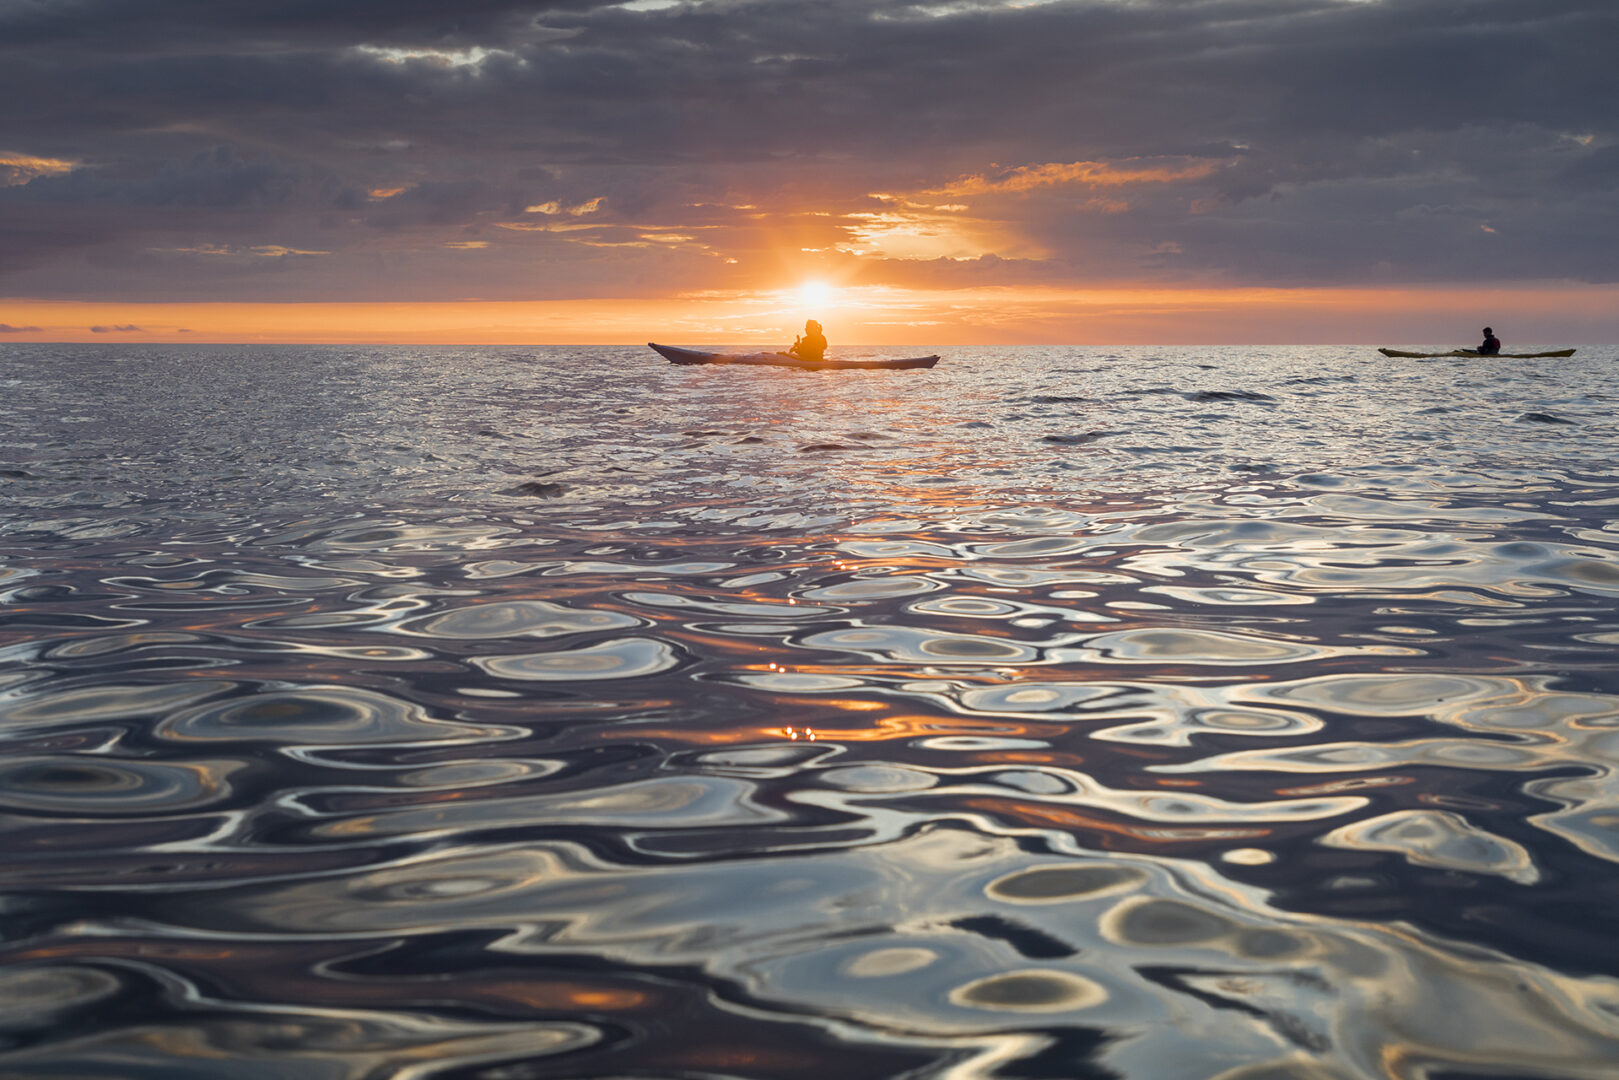
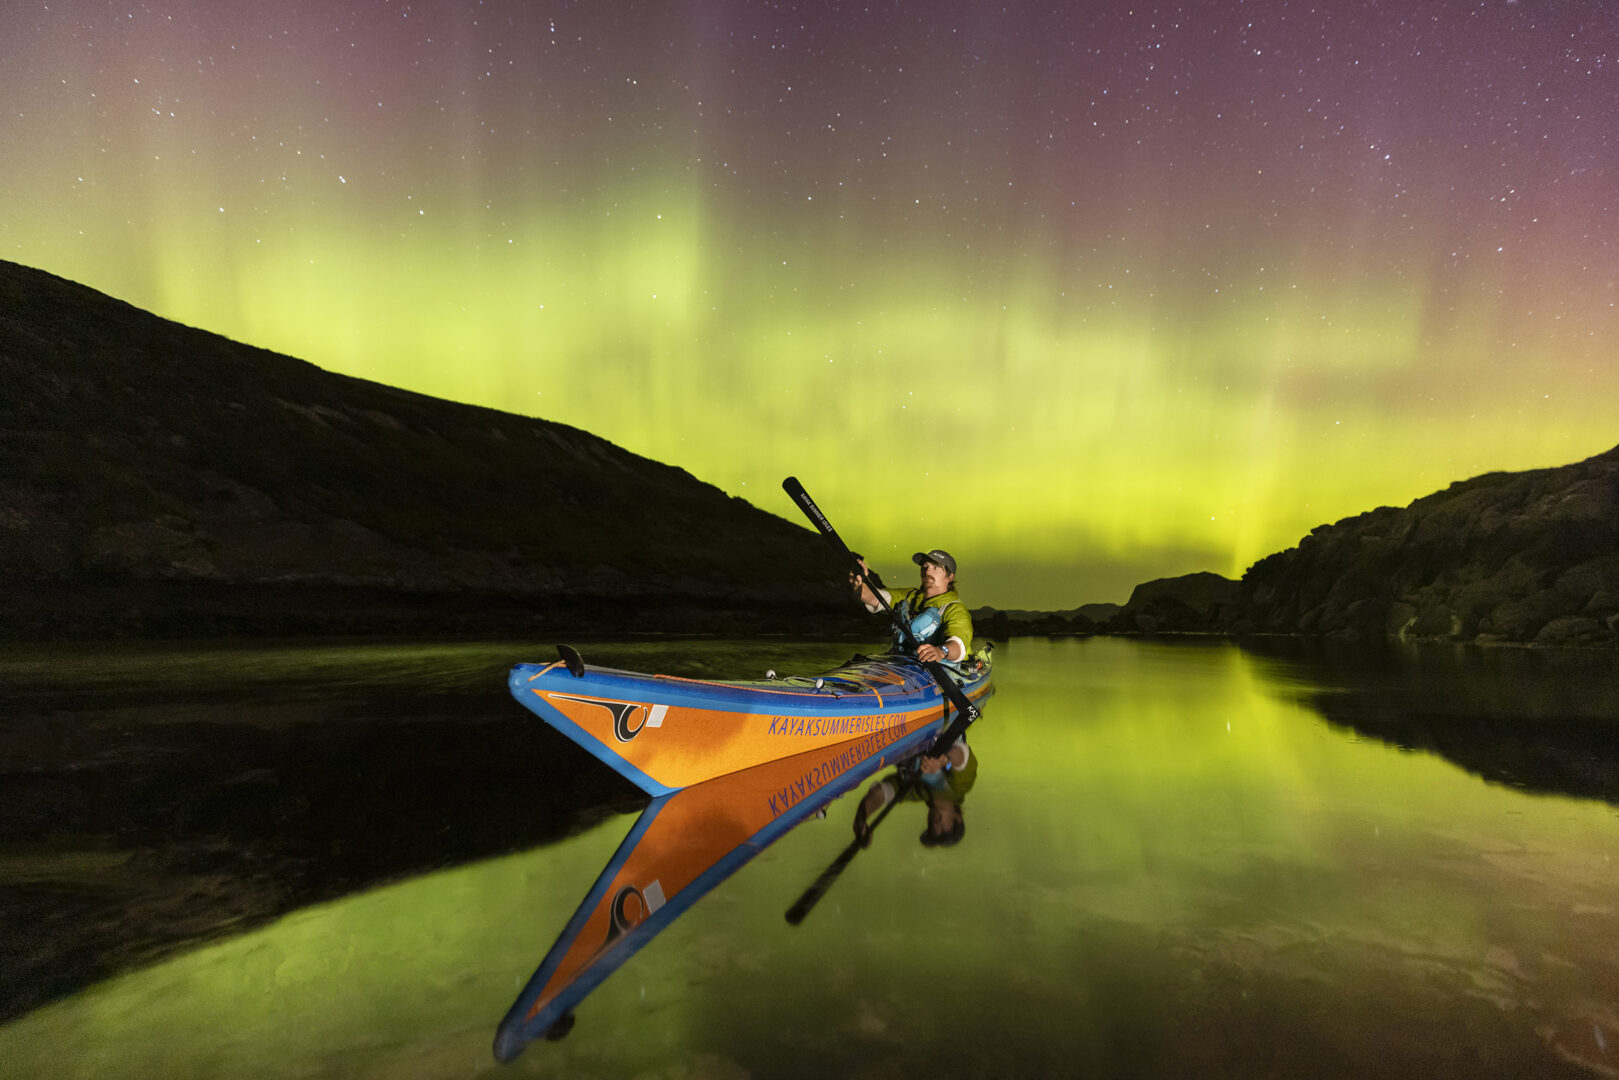
Low-Light photography
Shooting in low light can be a real challenge, especially from a moving boat. Here are our top tips to making the best out of your image.
- Understanding your camera settings:
- ISO is the ‘sensitivity’ of the camera’s sensor, a higher value e.g ISO 1600 will let more light be taken by the sensor than ISO 50. The higher the ISO however the more grain and noise your image will poses. Nowadays modern cameras, even camera phones can deal with this remarkably well and may even have internal noise reduction. A lot of this can be recovered/smoothed later in post editing.
- Aperture is like your eye, dilating or contracting the size of light that is let through the lens. This is measured by ‘f stop’. A lower value such as ‘f 2.8’ is a wide aperture, like your eyes dilated at night. This will let more light in at the expense of depth of field which is the range of distance captured in focus by the camera. In dark environments lower ‘f stops’ will allow you to shoot a faster shot as they let more light in. The same goes with narrower f stops e.g ‘f 22’ which lets little light through the lens but captures a far greater range of distance in focus.
- Shutter Speed controls the speed the camera takes the image. Anything below 1/100 will likely result in blur at the paddle tips. For kayaking I recommend a minimum of 1/200 which although relatively fast helps to maintain the paddler sharp. For dark images I tend to aim for this mark and adjust my ISO and Aperture to allow this.
Use of light can also be a valuable tool. A head-torch or diffused light will add extra information to your cameras sensor for fore and mid ground subjects and can make a far more powerful image as a result.
- Keep Still. – The simplest solution is to minimise movement. This can be both from the subject, but also from the paddler. The image below is a good example: This was taken from the shore, with the camera propped on a makeshift tripod (a tent bag filled with clothes on a rock). The paddler is carefully balanced on a rock, the paddle torqued against the seabed below to give a stationary position against the gentle wind. This is perhaps a more ‘staged’ photograph, but allows the result to match the experience.
Happy Shooting and Paddling
See you out there somewhere